What Is Solidarity Tech?
Solidarity Tech is a centralized organizing platform designed to help volunteers like you coordinate campaigns, manage events, and track organizing efforts. Whether you're working at the dashboard, on mobile, or sharing sign-up pages with supporters, Solidarity Tech is your command center for volunteer engagement.
Three Ways to Use Solidarity Tech
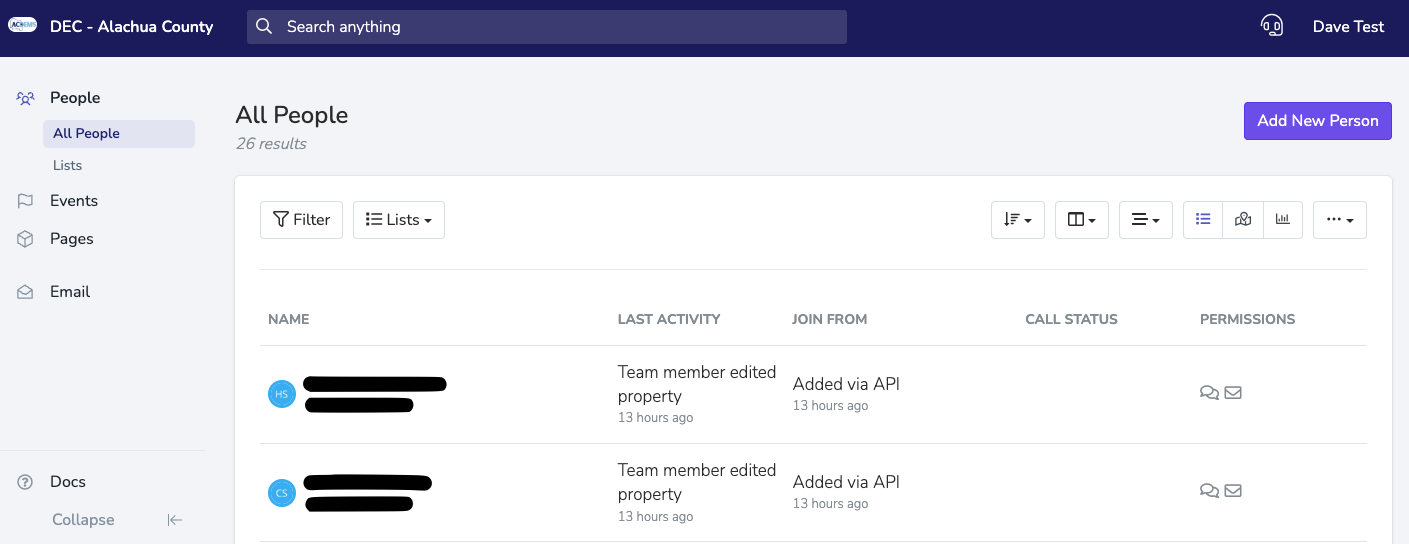
Your main command center is at dashboard.solidarity.tech. This is where you'll do most of your organizing work, from creating events to managing volunteers.
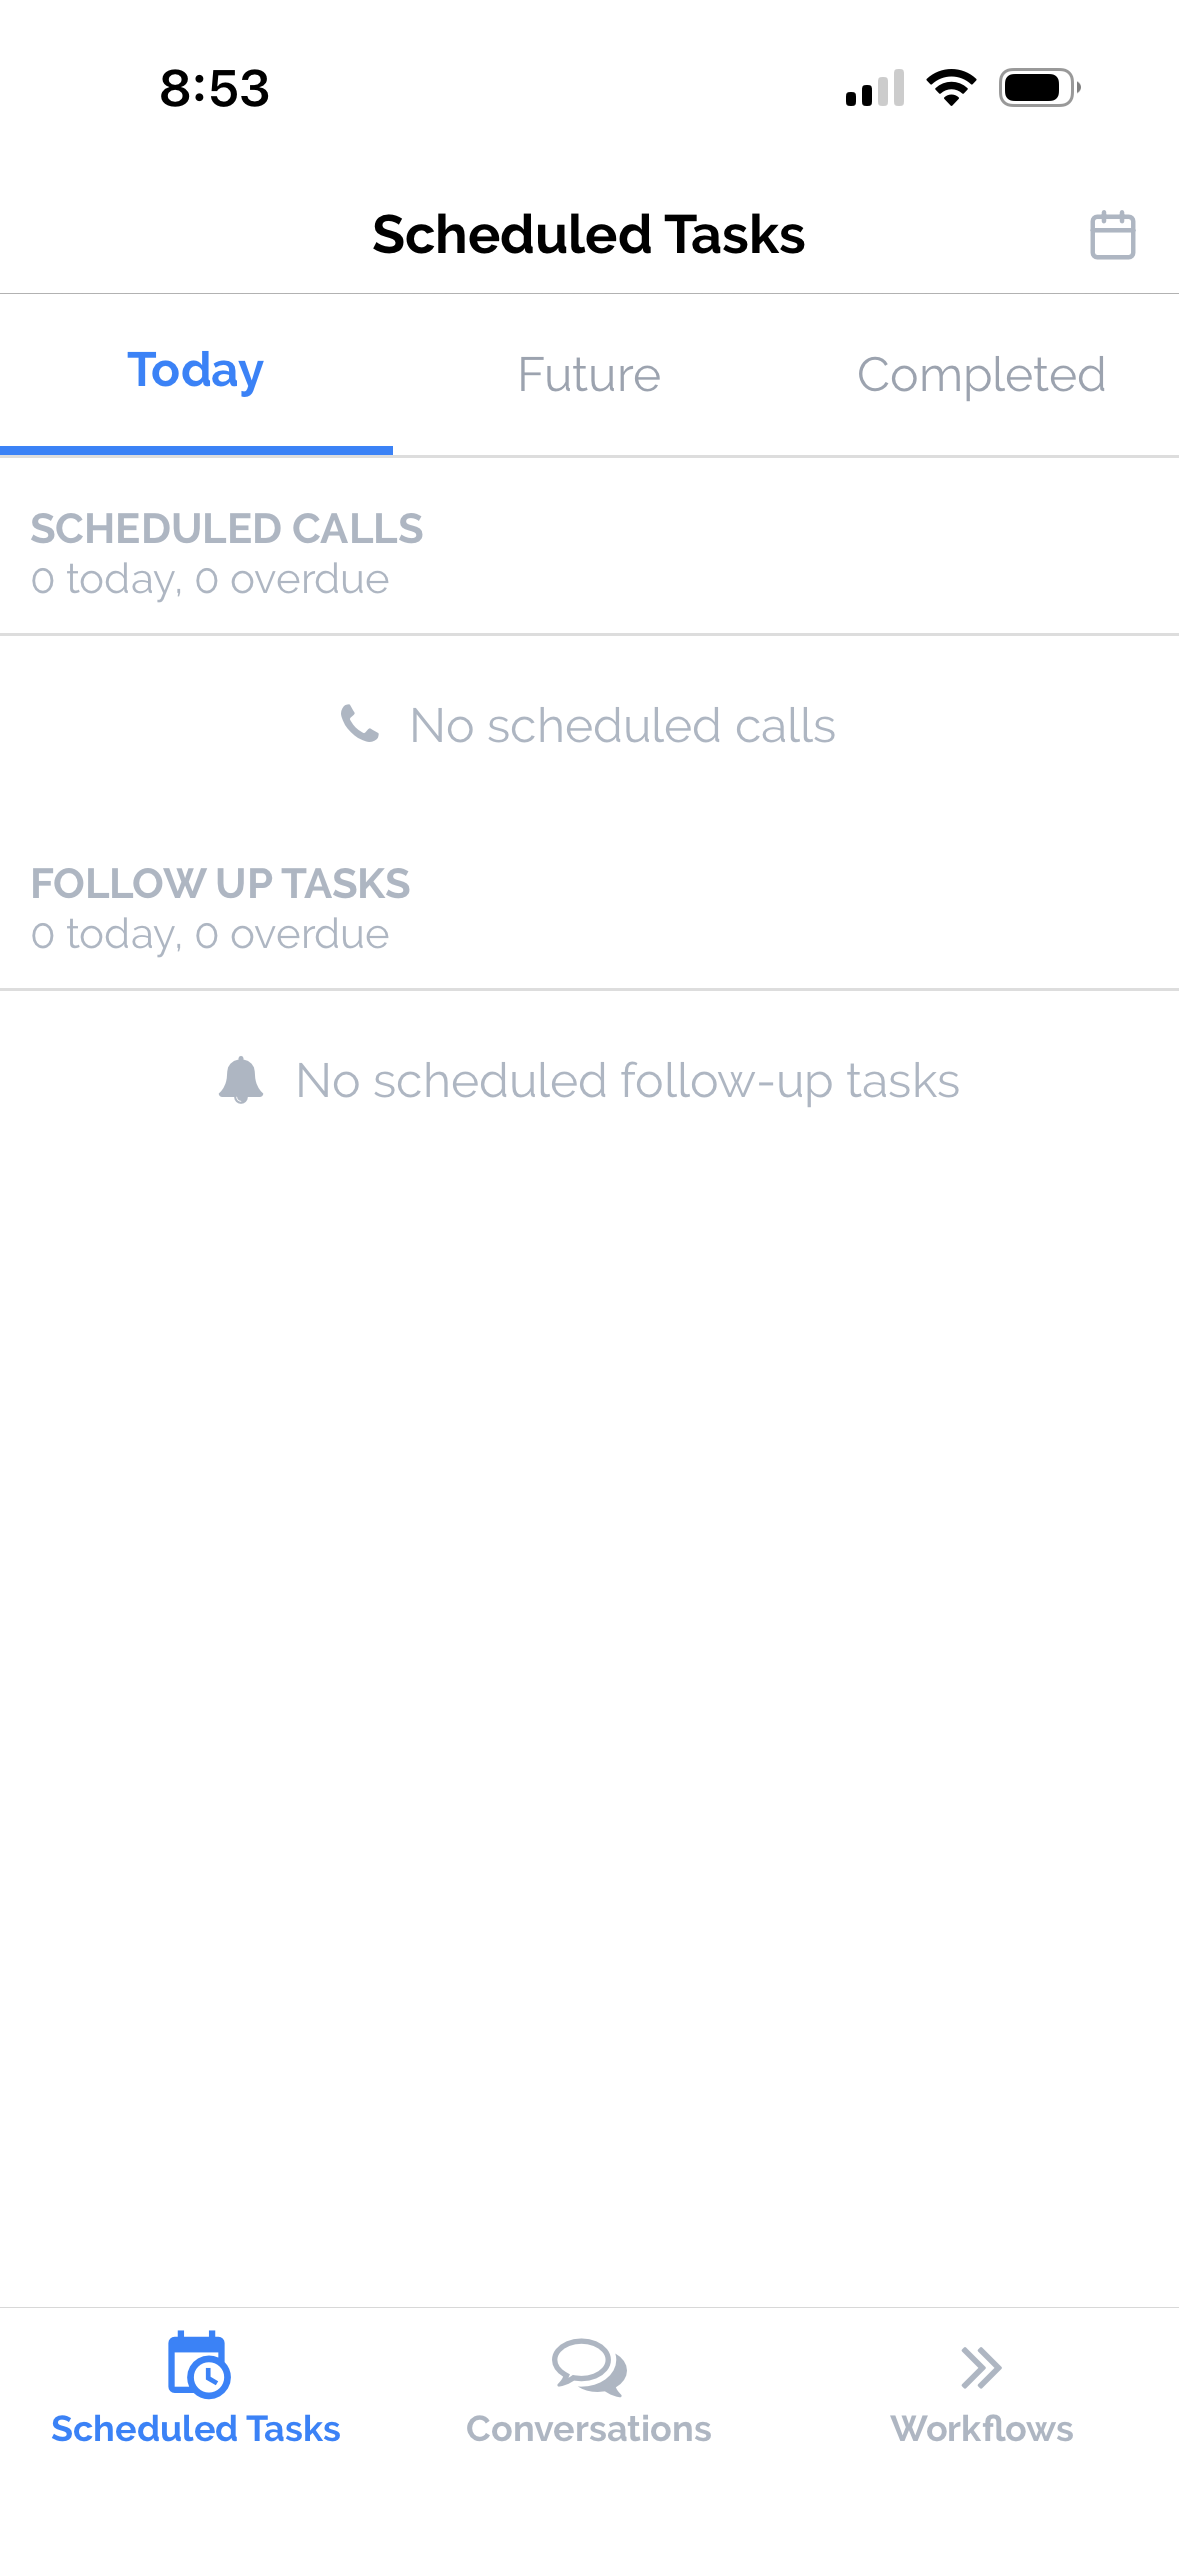
Organize on the go! Download the mobile app at solidarity.tech/app available on both iOS and Android.
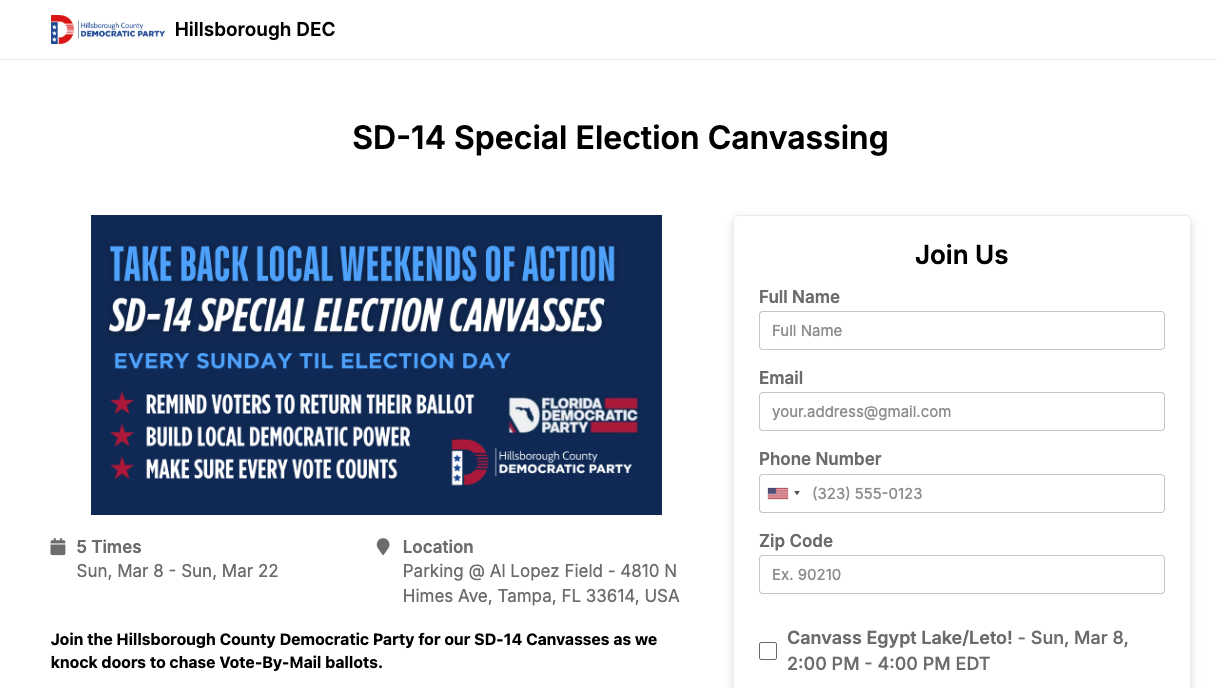
These are the web pages supporters see when they're signing up to volunteer. You create these through Solidarity Tech and share them on social media, flyers, or emails to recruit volunteers.
What You'll Do with Solidarity Tech
- Create and manage events
- Recruit and track volunteers
- Coordinate volunteer recruitment efforts (email, phone banking, texting*)
*Email, phone banking, and texting features will be available at a later date.
What Solidarity Tech Does NOT Do
- No voter data - this is volunteer organizing only
- It does not replace VoteBuilder - use Solidarity Tech for volunteers, VoteBuilder for voters
How to Log In
Getting access to Solidarity Tech is a three-step process: receive an invitation, create your account, and log in. Let's walk through each step.
Step 1: Receive Your Invitation
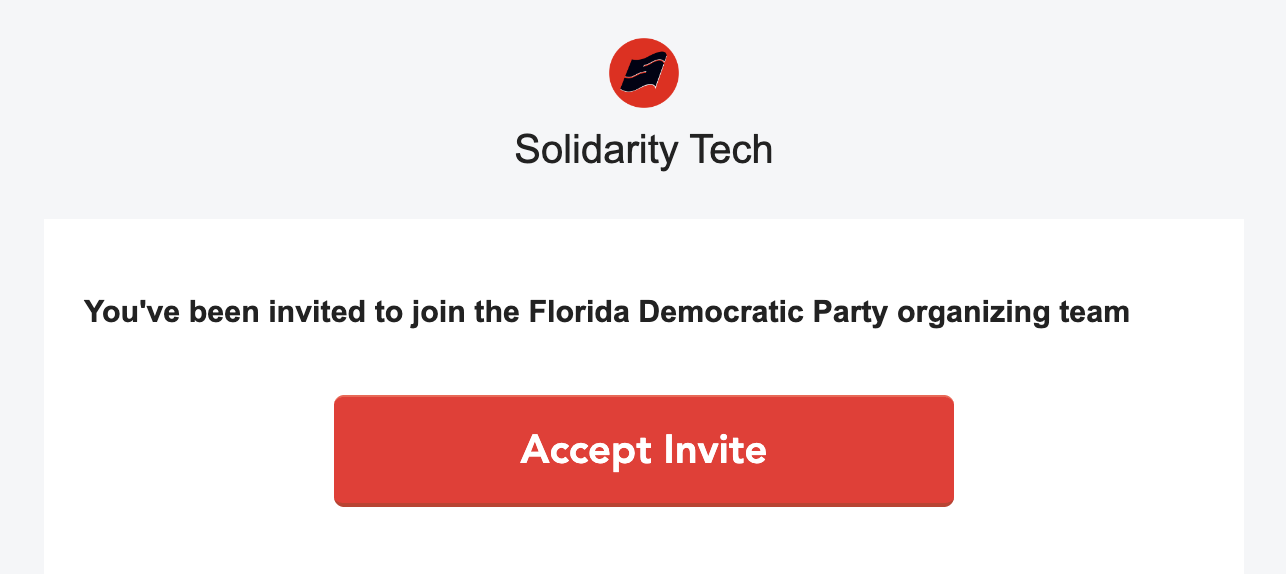
To get started with Solidarity Tech, your DEC chair or the FDP Data Team will add you to the system. You'll receive an invitation via text or email with a link to set up your account.
Step 2: Create Your Account
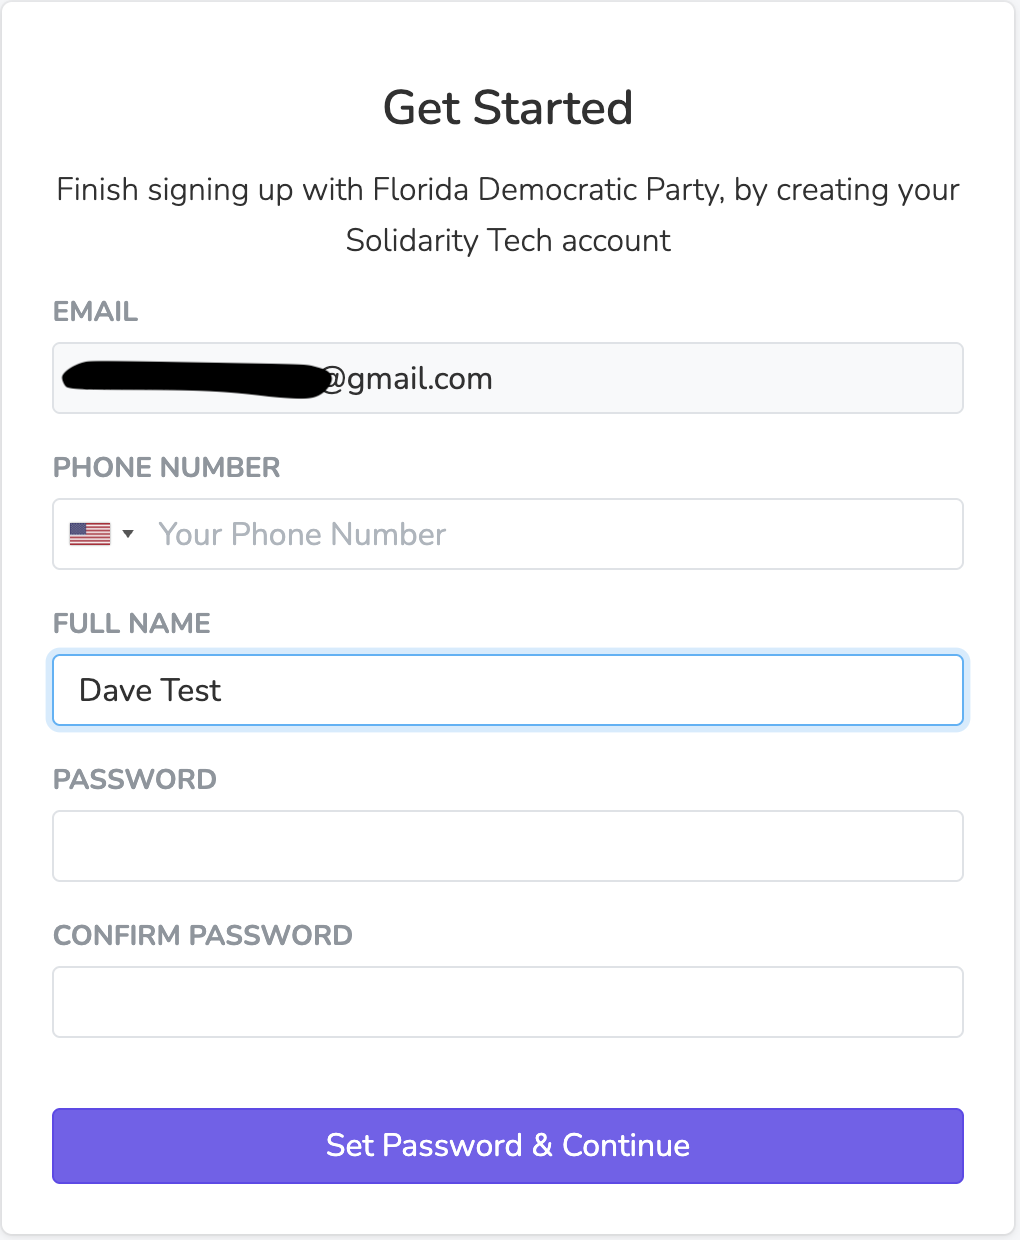
Click the invitation link, and you'll be taken to a page where you can set up your account. Enter your email, create a password, and click Submit.
Step 3: Log In
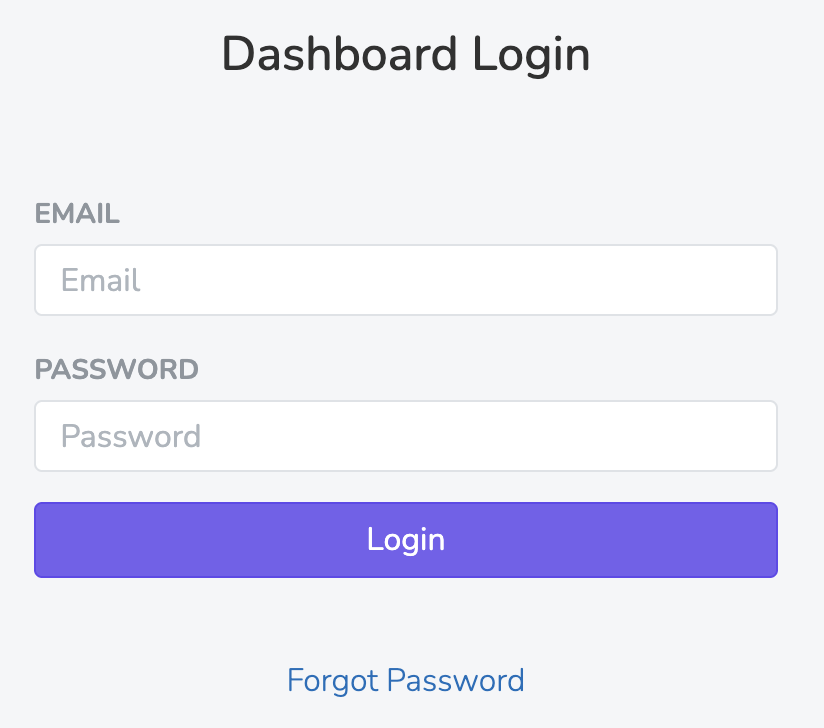
Now you're ready to log in!
- On Computer: Go to dashboard.solidarity.tech
- On Phone: Download the app from solidarity.tech/app (iOS App Store or Google Play)
Forgot Your Password?
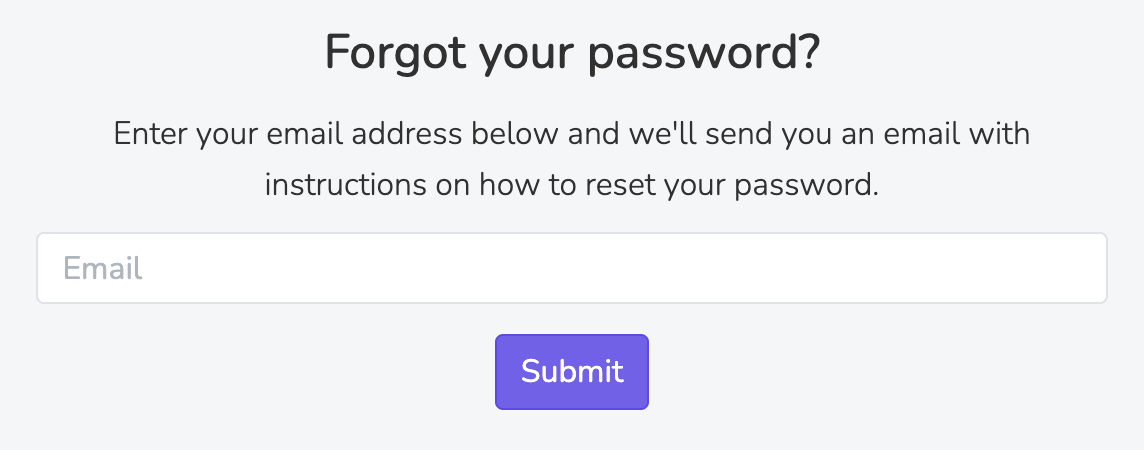
If you forget your password, follow these steps:
- Go to the login page
- Click "Forgot Password"
- Enter your email address
- Check your email for a password reset link
Understanding Your Dashboard
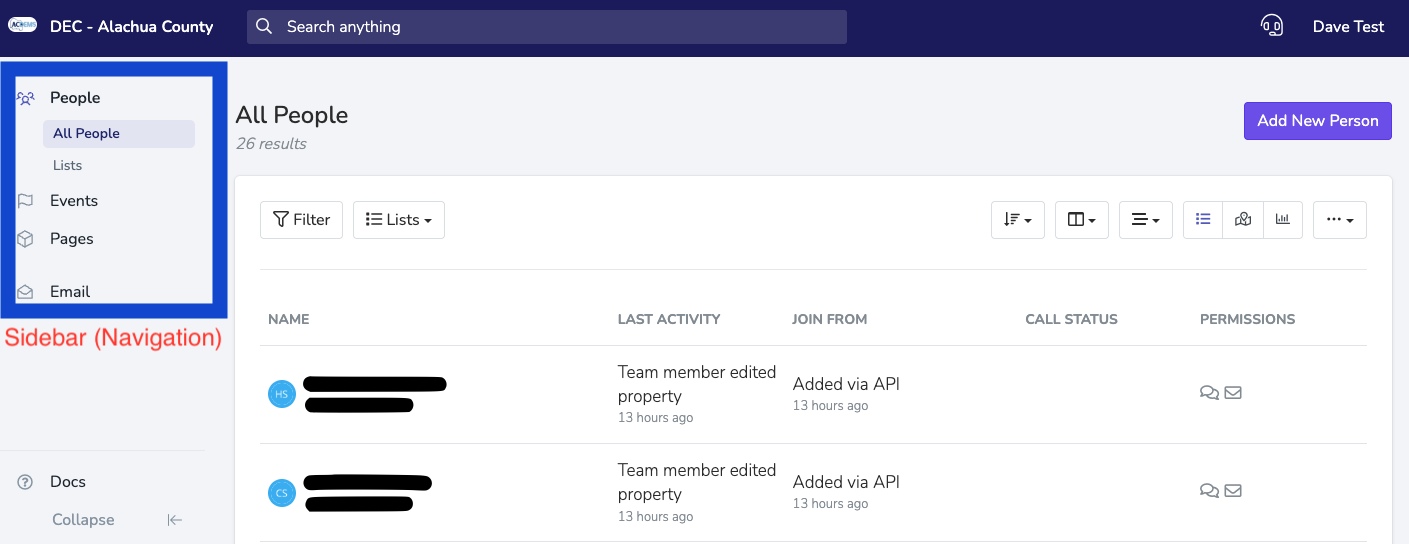
Once you've logged in, you'll see the Solidarity Tech dashboard. It's organized to give you quick access to all the tools you need for organizing.
The Left Sidebar
The left sidebar contains the main navigation menu. Here's what you'll find:
- People - View and manage your volunteer contacts (Admin only)
- Events - Create and manage events
- Pages - Create sign-up pages and forms
- Email - Send emails to volunteers
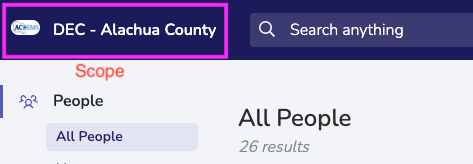
Your Scope
In the top left corner of your dashboard, you'll see "Your Scope." This controls which contacts and events you can see. If you work with multiple organizations, you can switch between them here.
Your Role & What You Can Do
Your access to Solidarity Tech depends on your role. There are three main roles in Solidarity Tech, each with different permissions.
Role Overview
| Role | Description | Best For |
|---|---|---|
| Admin | Full access to all features | DEC chairs and organizing leads |
| Organizer | Can create and manage events, pages, and draft emails | Event coordinators and recruiters |
| User | Can participate in workflows (check in, view contacts) | Volunteer coordinators at events |
Detailed Permissions by Role
| Action | Admin | Organizer | User |
|---|---|---|---|
| View contacts | ✓ | ||
| Edit contacts | ✓ | ||
| Create events | ✓ | ✓ | |
| Take attendance/check in | ✓ | ✓ | ✓ |
| Create pages | ✓ | ✓ | |
| Draft emails | ✓ | ✓ | |
| Send emails | ✓ |
Events: The Complete Walkthrough
Key Point: The main difference between Solidarity Tech and Mobilize for event creation is that event sessions and event pages are different things rather than one page. An event is your internal management tool (sessions, RSVPs, etc.), while the event page is what you share with supporters to recruit them.
Part A: Create the Event
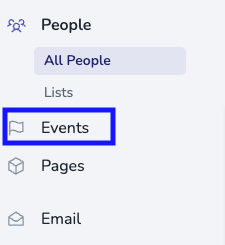
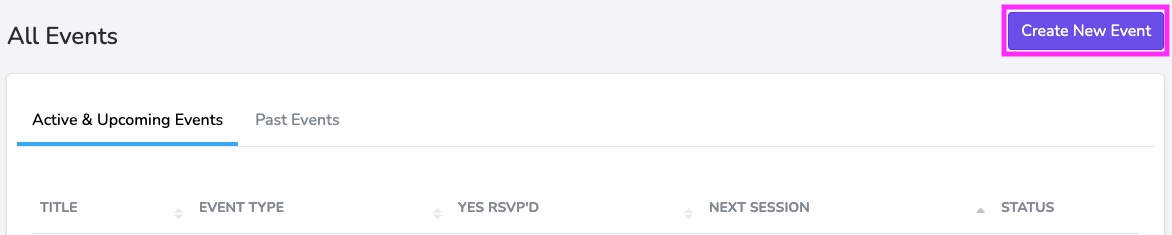
Click "Events" in the left sidebar, then click "Create New Event" button in the top right.
You'll see the Create New Event form.
Give your event a clear, descriptive name. Here are some examples:
| Good Names | Names to Avoid |
|---|---|
| School Board Town Hall - March 15 | Event1, Meeting, Important Thing |
| Phone Banking: City Council Campaign | stuff, test |
| Canvassing - Downtown District | ASAP, Urgent |

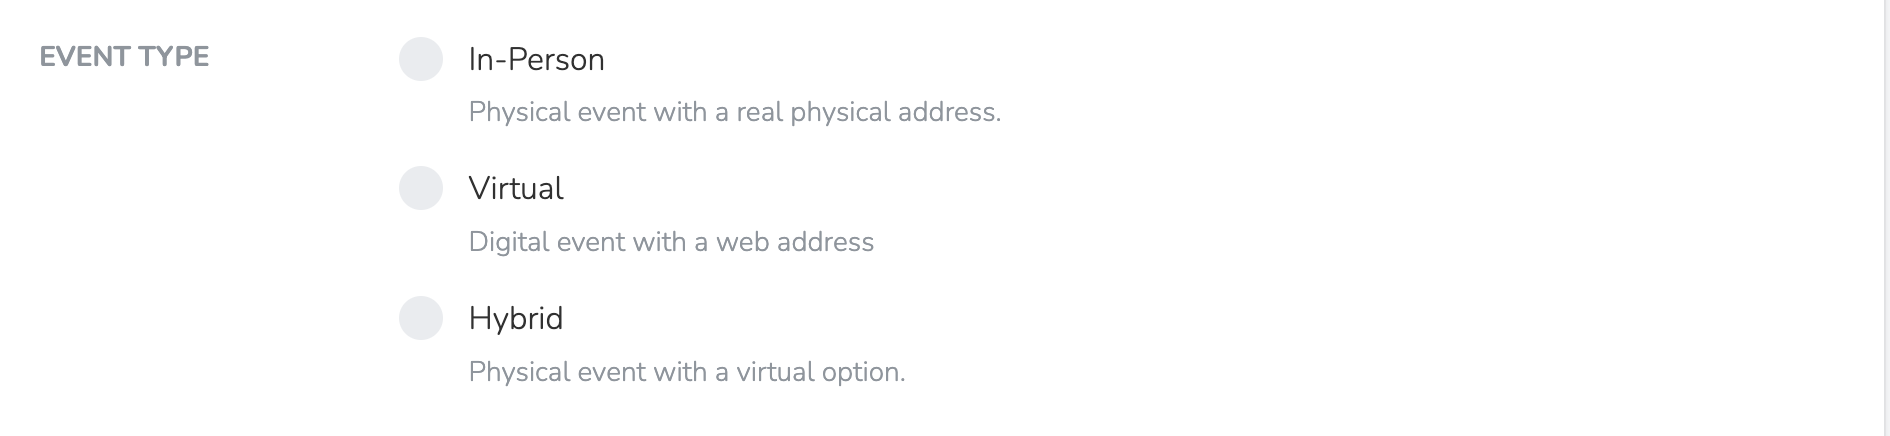
Choose between three event types:
- In-Person: Physical event with a real physical address
- Virtual: Digital event with a web address (meeting link or Zoom account)
- Hybrid: Physical event with a virtual option — both an address and a meeting link
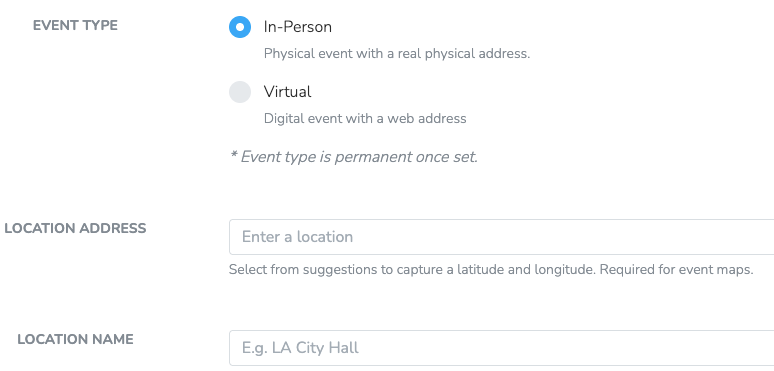
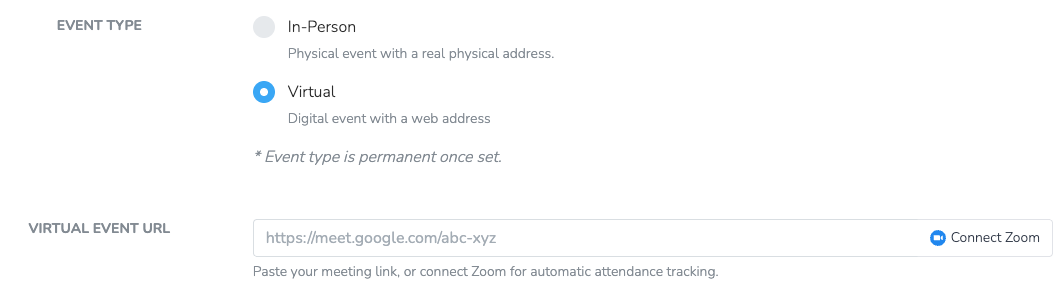
Depending on your event type:
- In-Person: Enter the full address. Solidarity Tech will auto-complete the address as you type.
- Virtual: Select Zoom account (if available) or paste a meeting link
- Hybrid: Enter the physical address and the virtual meeting link or Zoom account — attendees can choose how they want to participate.
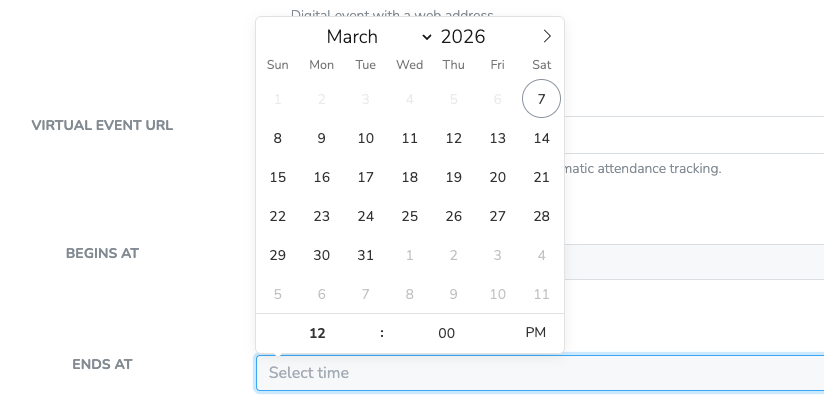
Select the date and start/end times for your event.
Click "Create" or "Save" to complete the event creation. Your event is now in the system!
Part B: Full Event Creation Walkthrough
Watch this video walkthrough of the entire event creation process from start to finish:
Part C: Adding Sessions
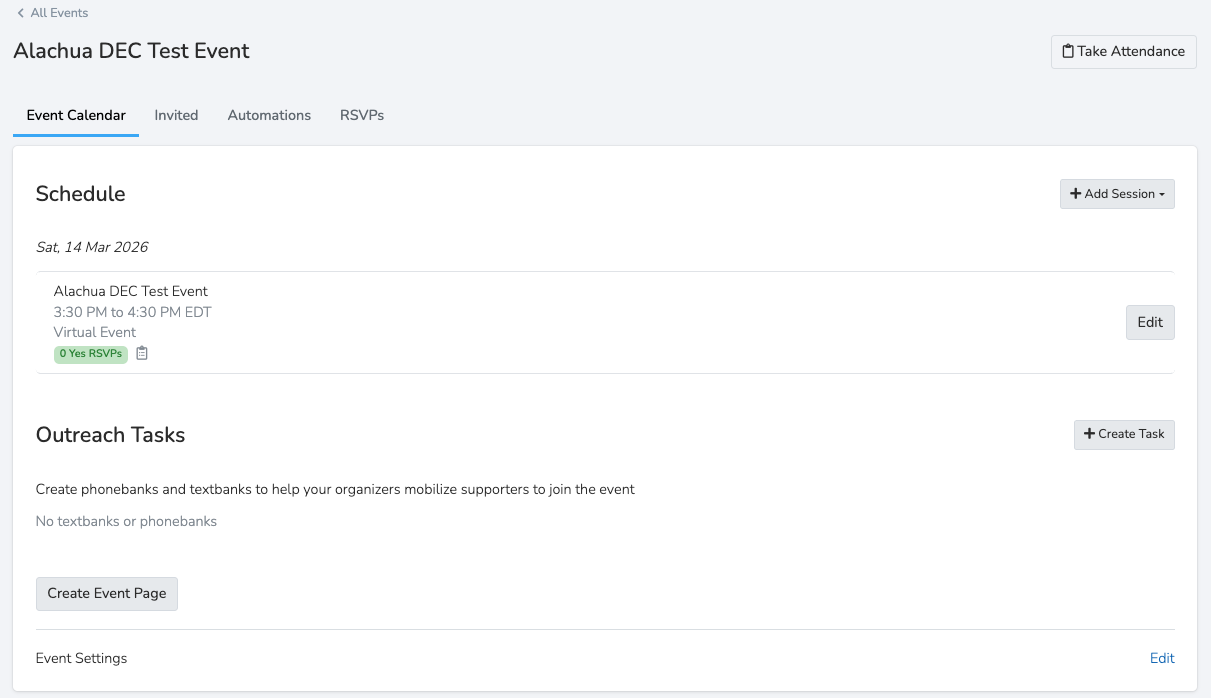
Events can have one or more sessions. Each session has its own start time, end time, location, and title. This is useful for recurring events or events with multiple time slots.
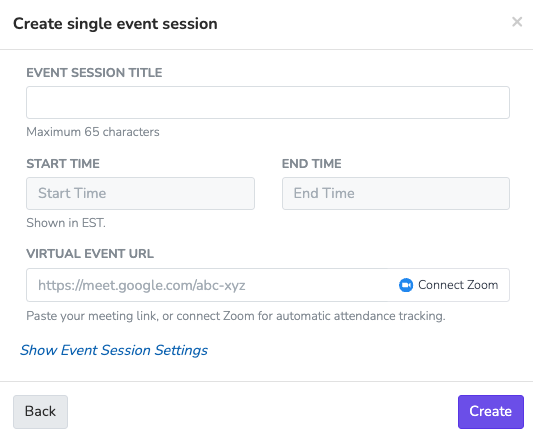
Follow these steps to add a session to your event:
- Open your event
- Click on the "Schedule" tab
- Click "Add Session"
- Set the session start and end times
- Set the session location (can be different from event location)
- Set the session title (optional)
- Click "Create"
- Your session is added to the event
For events that happen on a regular schedule (weekly meetings, daily shifts), you can set them to repeat automatically:
- Create your first event session as normal
- Click "Add Session" again
- Instead of adding a single session, look for "Make Recurring"
- Choose the recurrence pattern: Daily, Weekly, or Monthly
- Set when the recurring sessions should end
- Click "Create"
- Solidarity Tech will automatically create all the sessions
Part D: Adding Event Sessions Walkthrough
Watch this video walkthrough of adding sessions to an event:
Part E: Event Settings
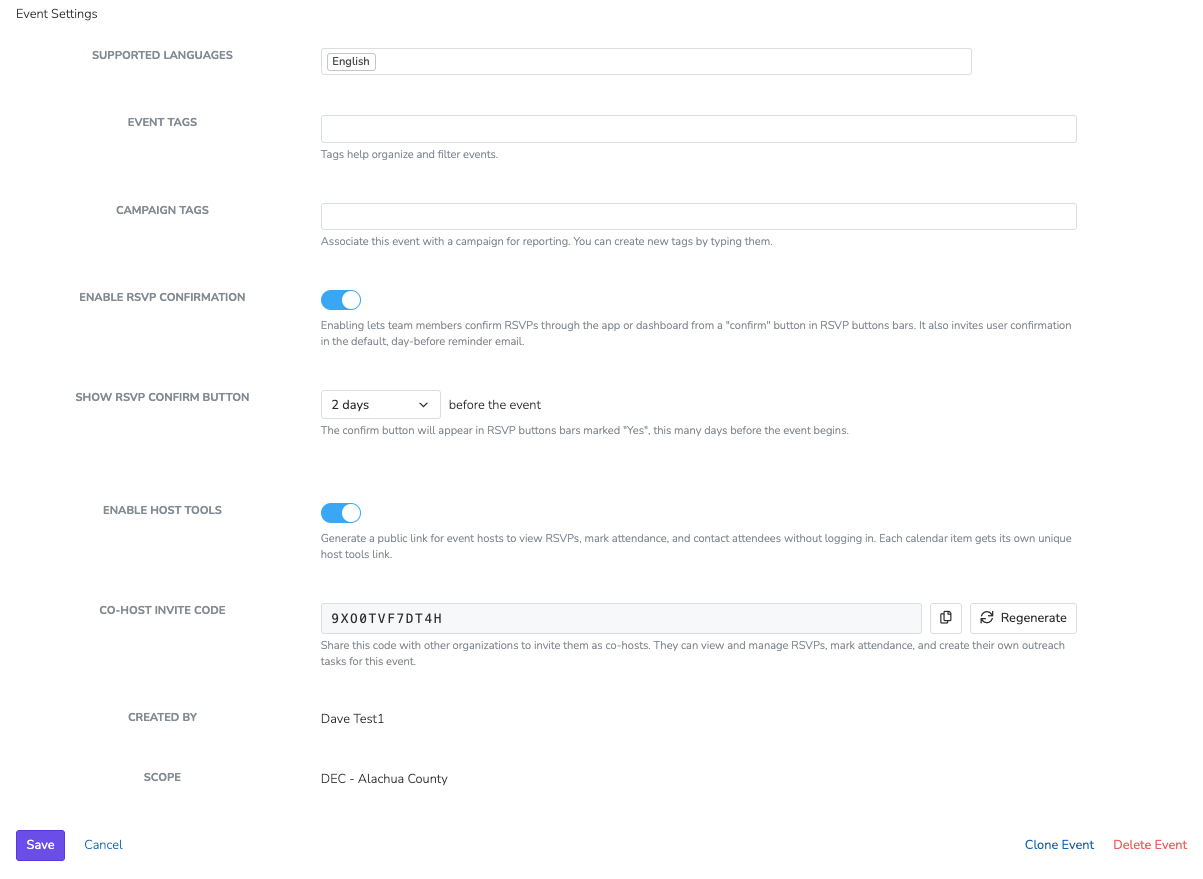
Before creating the event page and sharing your event, review the settings to make sure everything is configured correctly. At the bottom right of the page select Edit to view the event settings.
- Languages: Set what languages information about this event will be available in
- Event/Campaign Tags: Tag your event for organizing and filtering (e.g., "Private" to hide from main calendar)
- Enable RSVP Confirmation: Adds a "Confirm" button that appears before the event for a more accurate headcount
- Enable Host Tools: Generate a public link for event hosts to view RSVPs, mark attendance, and contact attendees without logging in
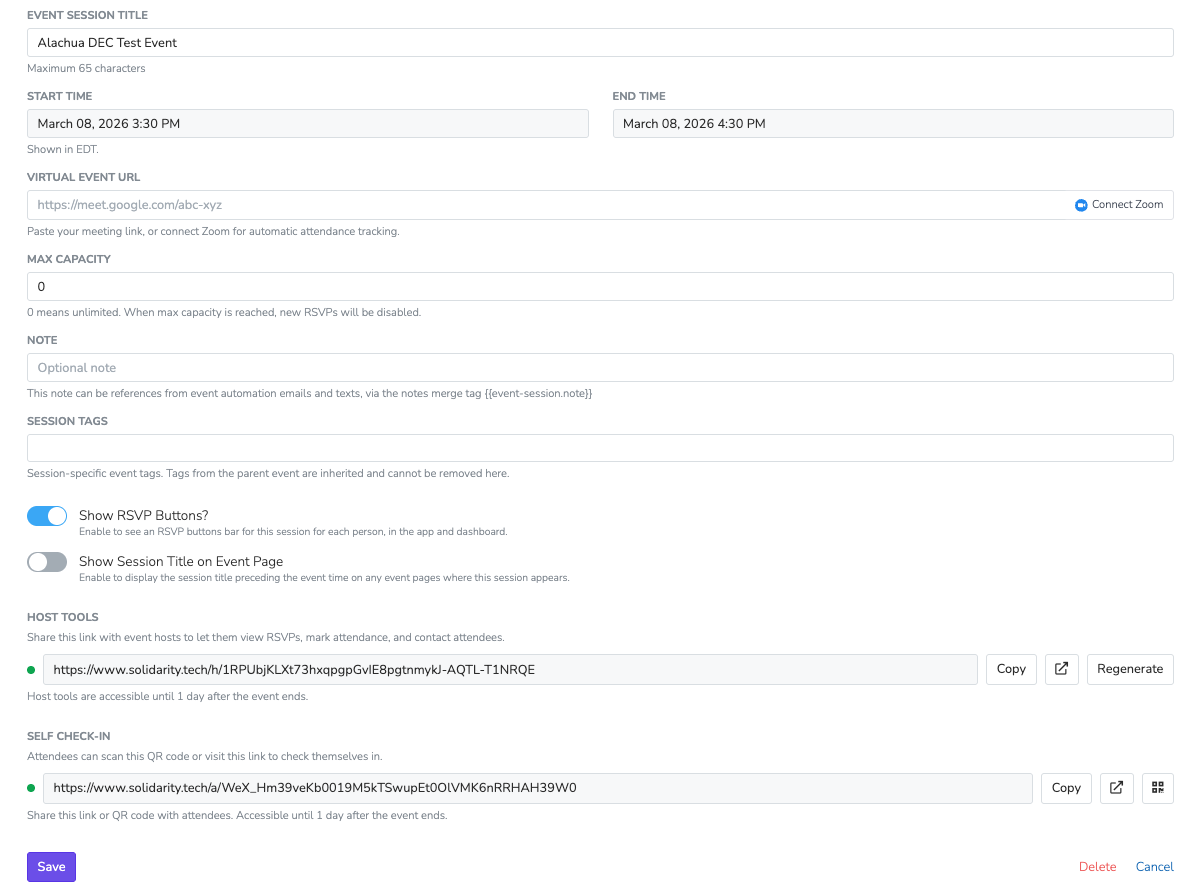
Once you've created sessions, you can edit them by clicking the Edit button on each session. Here are the key settings:
- Host Tools: Gives volunteer hosts access to check people in without a full dashboard account
- Self Check-In Link: A link or QR code that volunteers can use to check themselves in
- Delete: You can delete event sessions
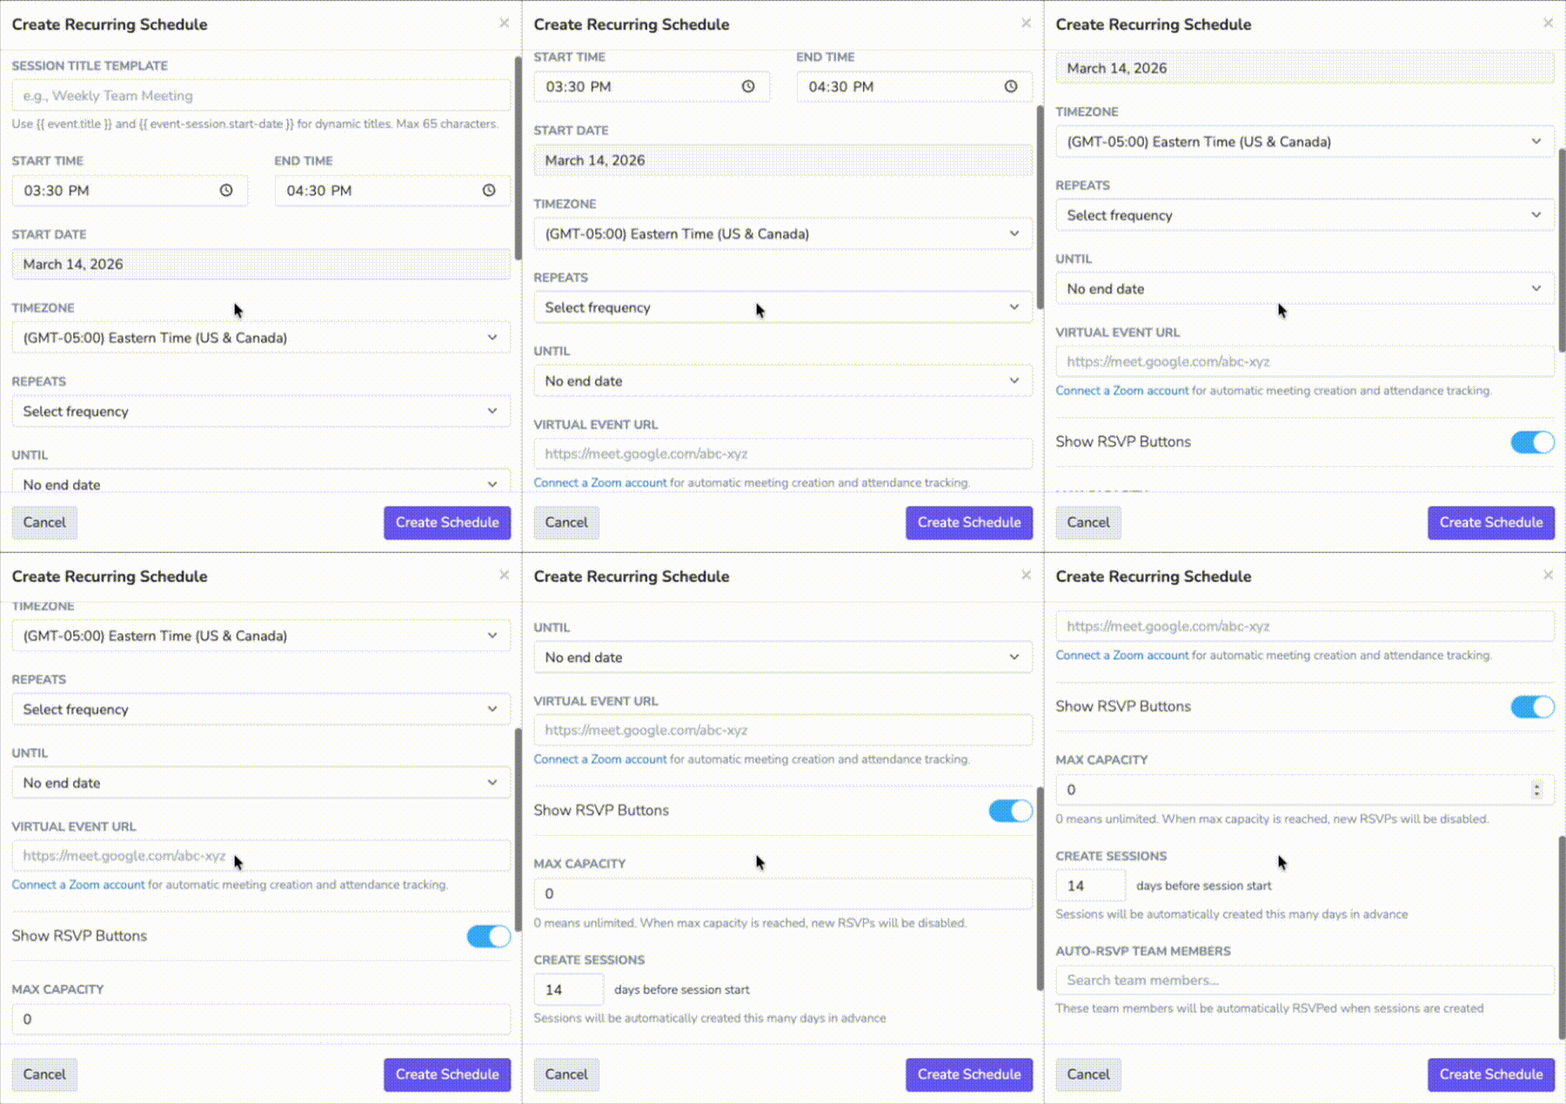
For events that occur on a regular schedule, Solidarity Tech can automatically create multiple sessions. This is useful for:
- Weekly team meetings
- Daily phone banking shifts
- Monthly town halls
Here's how recurring session settings work:
Part F: Other Event Tabs
You can set who is able to be RSVP'd for the event by an organizer. For instance, only allow people who have the Assessment of DEC/CC Member to be RSVP'd if this is an official DEC/CC Meeting where only members can attend.
Events come with built-in automated messages that you can turn on/off:
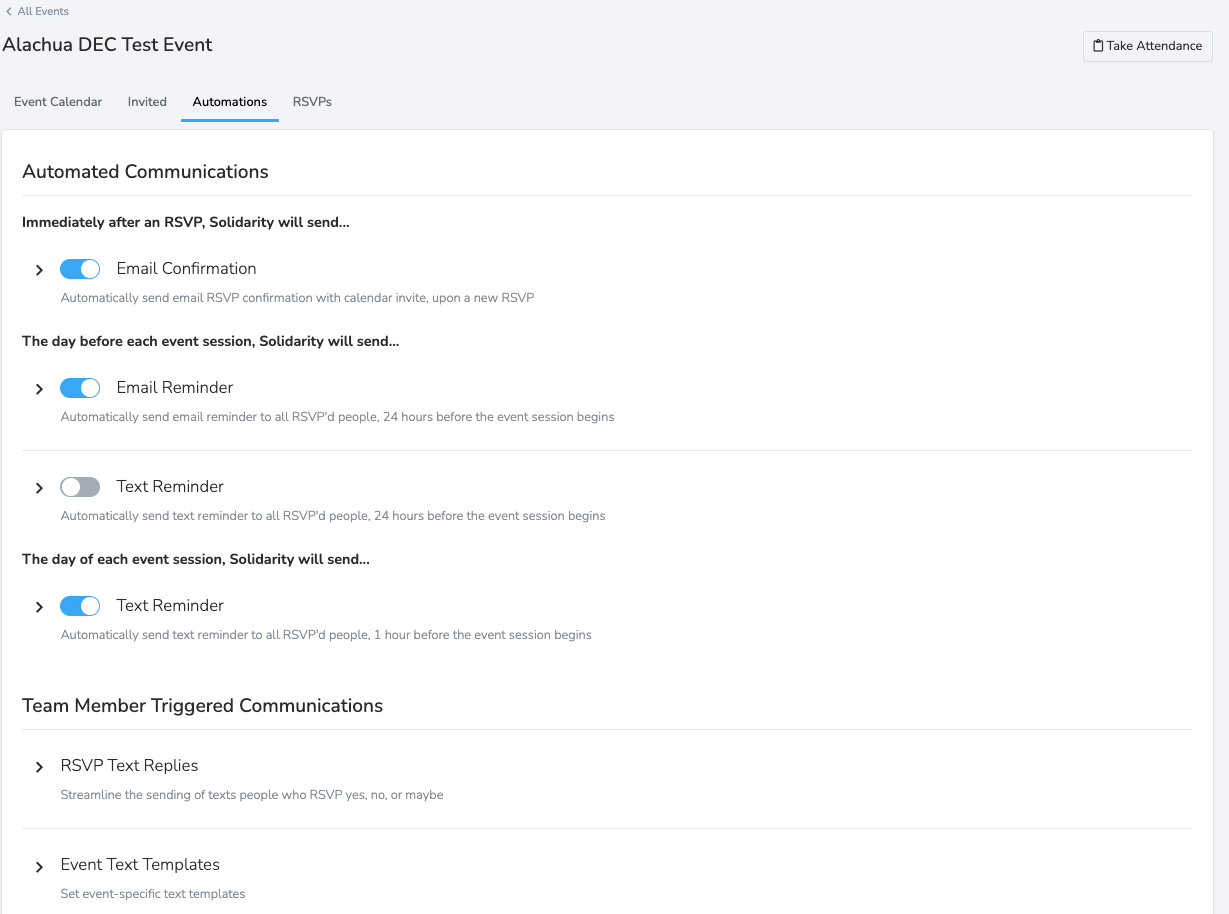
- RSVP Confirmation Emails: Sent when someone signs up
- Reminder Emails/Texts: Sent the day before and/or the day of the event
- Team Member Triggered Communications: Text templates that team members can send to people who have RSVP'd
These automations can be customized per event and translated into multiple languages.
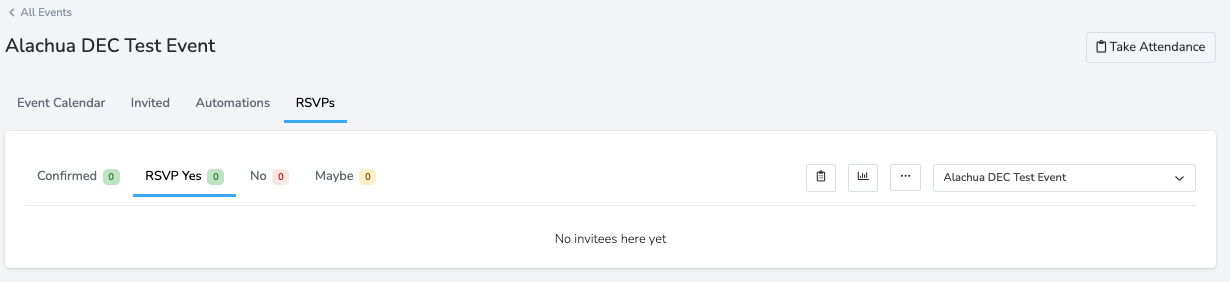
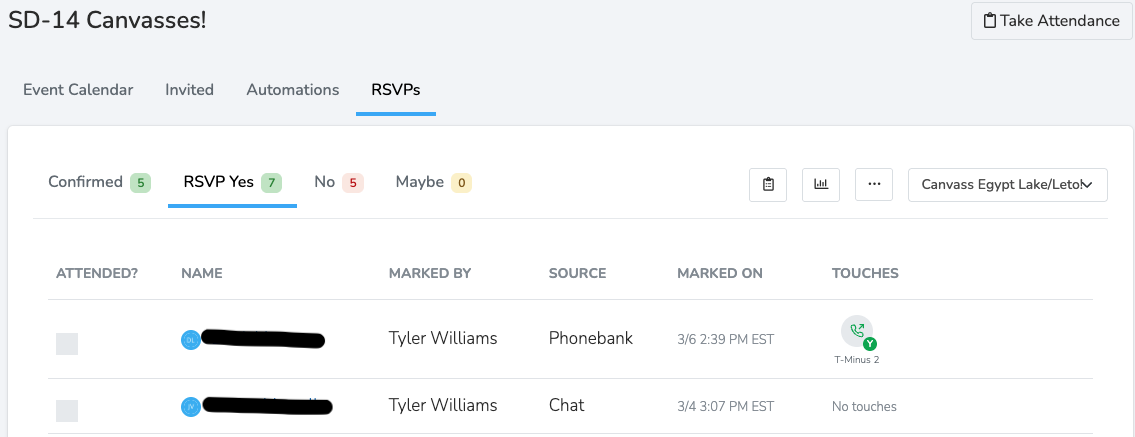
This tab shows the people who have RSVP'd for the event and their current status. You can choose what event session you are looking at with the dropdown in the top right.
Part G: Create & Share the Event Page
Here's how to create a page where supporters can sign up for your event:
- Open your event
- Click on the "Schedule" tab
- Select "Create Event Page"
- Select your organizations website and select Create Event Page
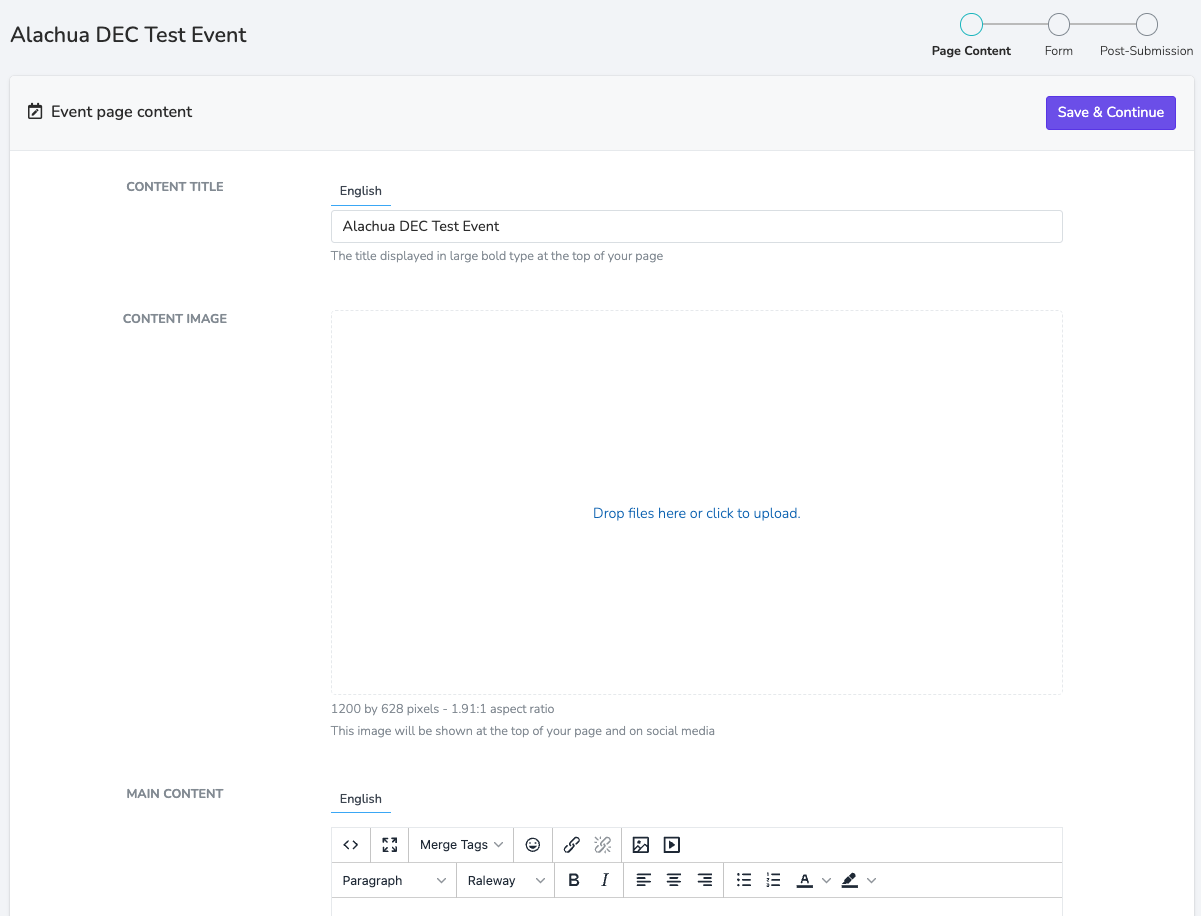
- Enter a title (usually the same as your event)
- Add a content image
- Write a description explaining why people should attend
- Add any merge tags, images, videos, or additional details
- Click "Publish" to make it live

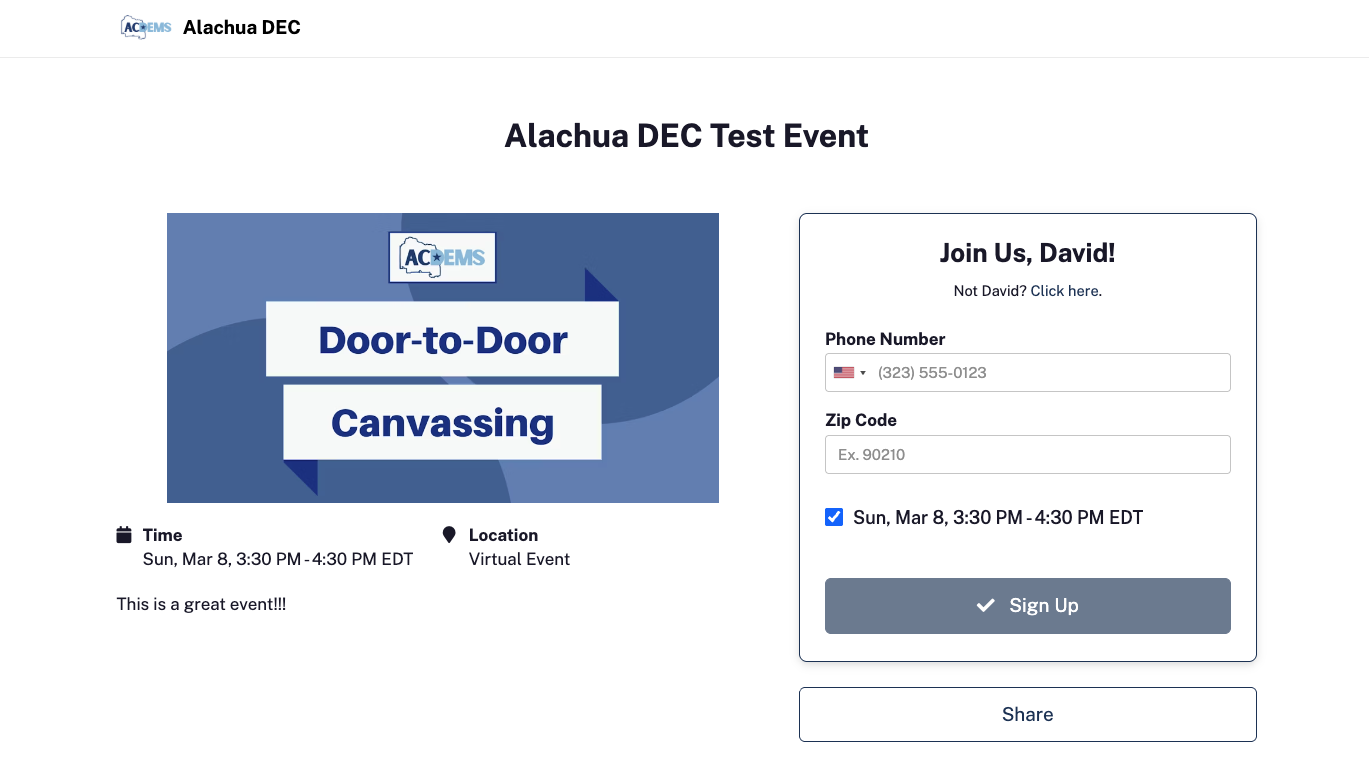
Once your event page is published, share it with the world:
- The event should automatically appear on your Solidarity Tech Org Homepage unless it is tagged Private
- Copy the page link from the page settings
- Post it on social media (Facebook, Twitter, etc.)
- Add it to your event flyers and email campaigns
- Email it to your volunteer list
Customize how your event page appears when shared:
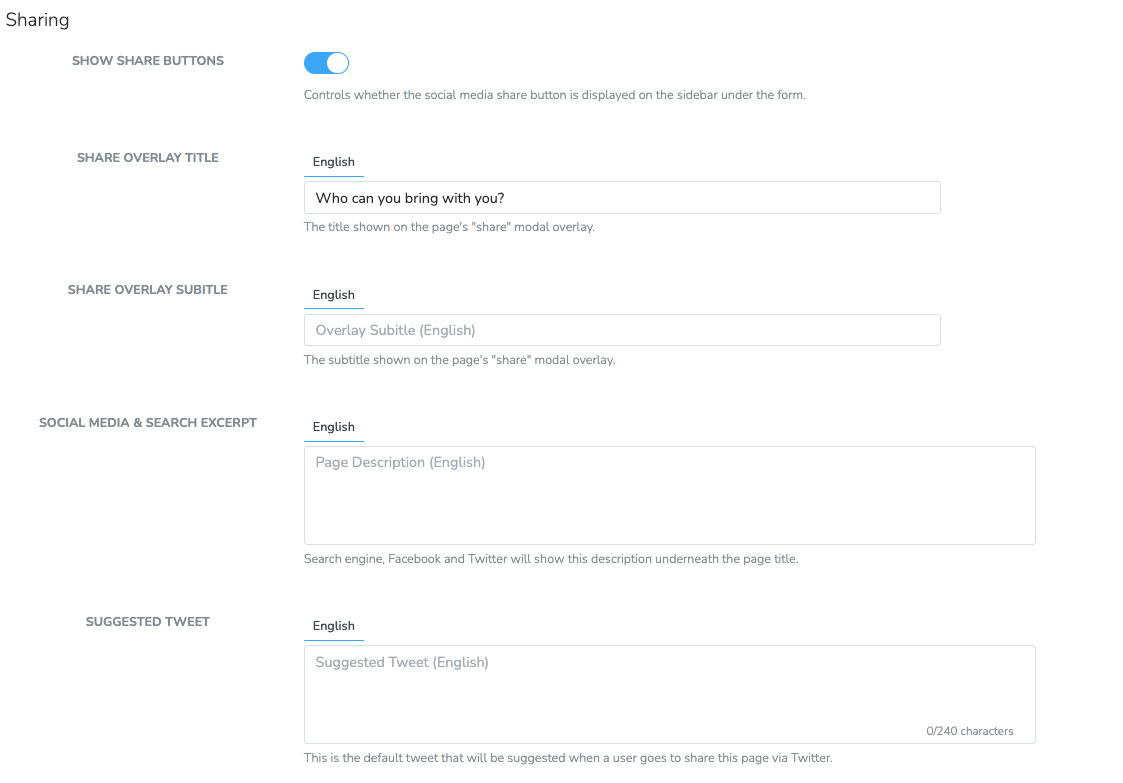
When someone clicks your event page and signs up:
- They appear in your RSVPs tab
- They receive a confirmation email
- They receive reminder emails/texts before the event
- Their contact information is saved in Solidarity Tech
Before you share your event page with the world, make sure you've covered everything:
Part H: Full Event Page Creation Walkthrough
Watch this video walkthrough of creating and sharing an event page:
Events: Managing RSVPs & Attendance
Once your event is live and volunteers are signing up, you need to manage who's coming and take attendance. Here's how to do it.
Checking Who Signed Up
To see all the volunteers who RSVP'd to your event:
- Click "Events" in the sidebar
- Click on your event
- Click the "RSVPs" tab
- You'll see everyone who signed up. You can filter by session if you have multiple time slots with the dropdown in the upper right.
Checking People In
When people arrive at your event, you need to mark them as present. There are two ways to do this:
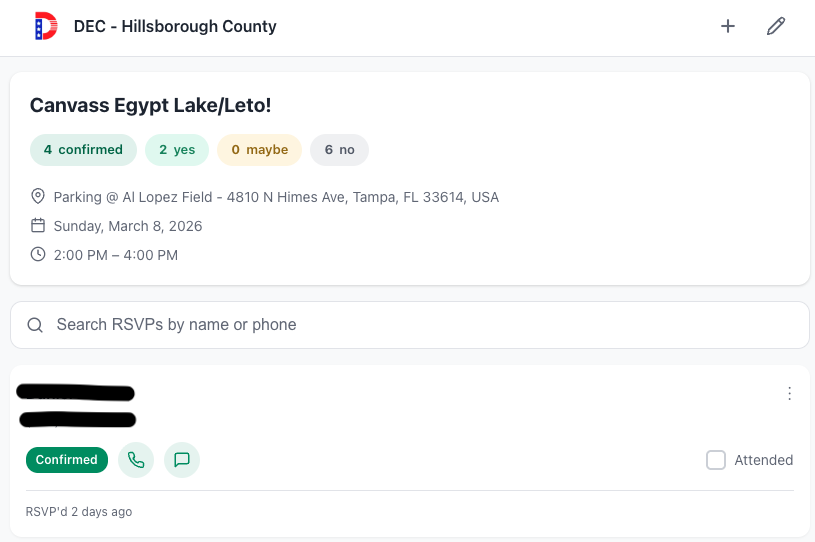
If you've enabled Host Tools for your event, volunteers can check people in using a simple interface:
- At the event, give volunteers the Host Tools link
- They can search for volunteer names
- Click the name to mark them checked in
- To add walk-ins (people who weren't on the RSVP list), click the + icon and add their info
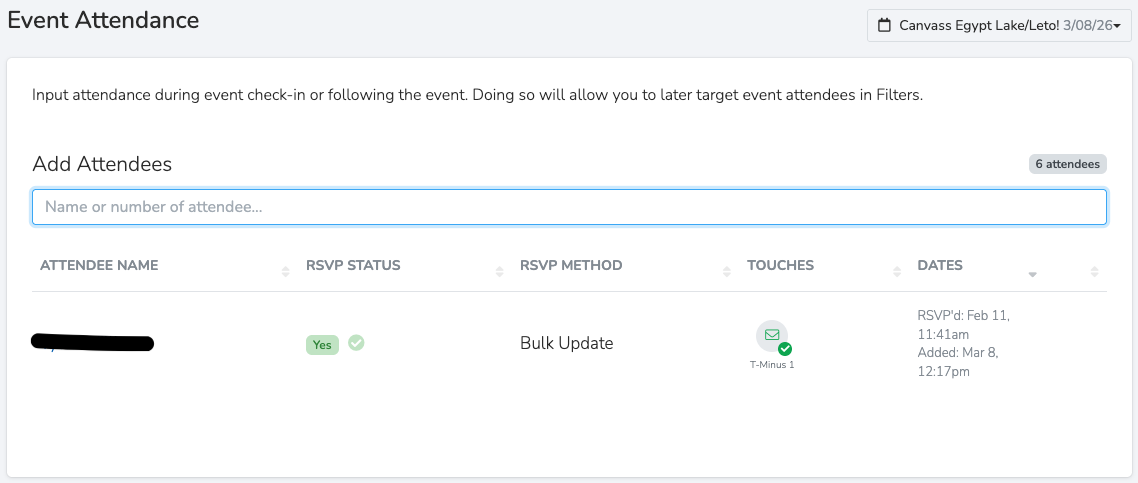
From the dashboard, you can also take attendance directly:
- Open your event
- Click "Take Attendance"
- Search for volunteers by name or phone number
- Click their name to mark them checked in
Someone Shows Up Who Isn't in the System?
No problem! During check-in, if someone isn't in the system:
- Search their name or phone number
- If they're not found, click "Add New Contact"
- Enter their information
- Mark them checked in
Self Check-In with QR Code
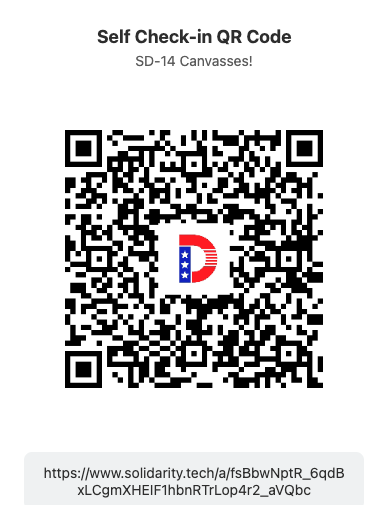
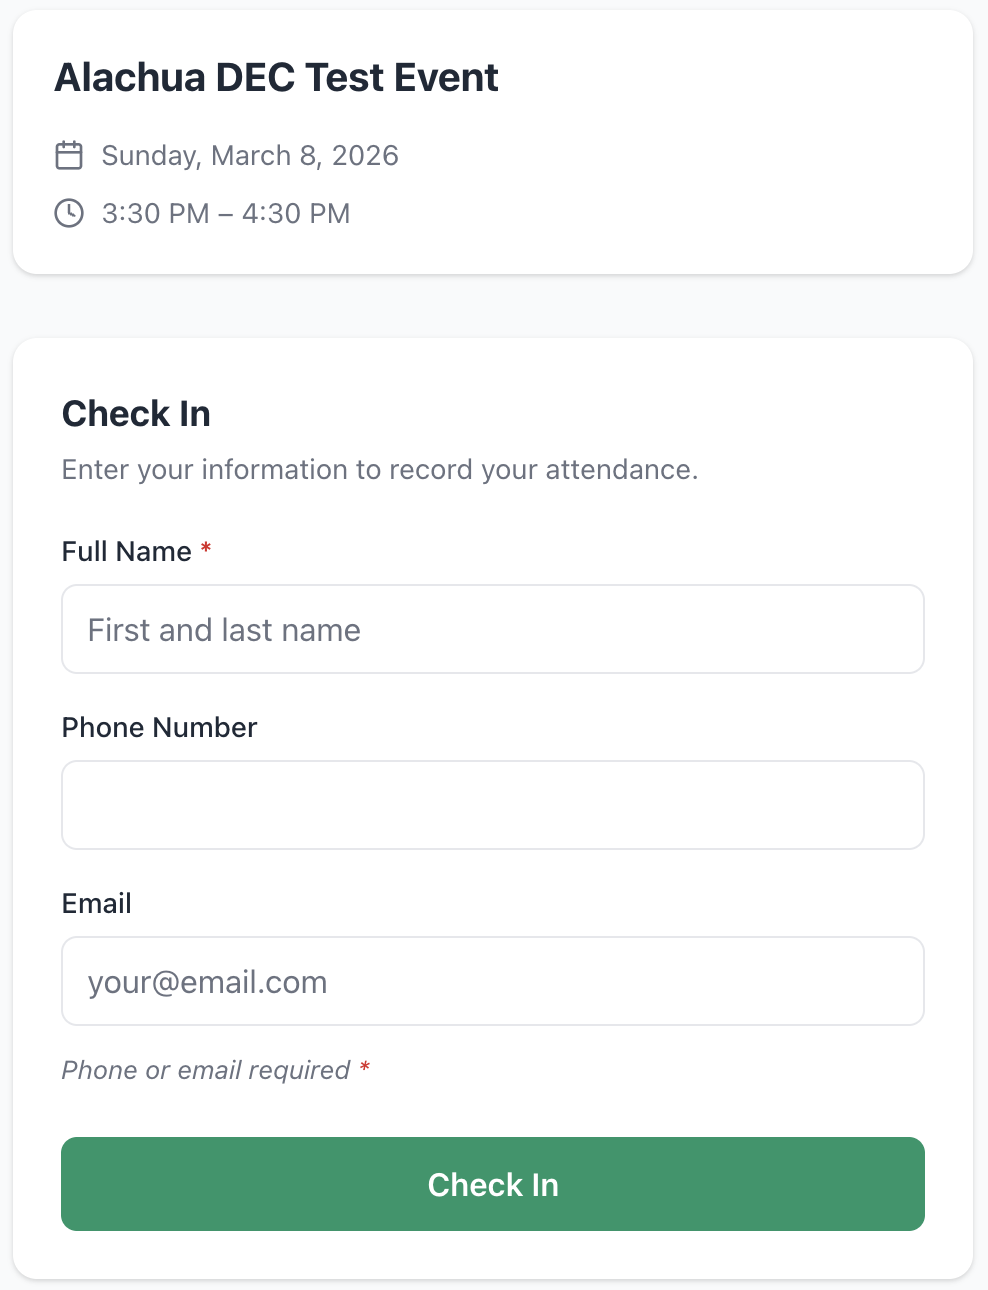
For a hands-off approach, you can generate a QR code that volunteers can scan to check themselves in:
- Open your event session
- Click the Edit button
- Find the "Self Check-In" section
- Copy the link or download the QR code
- Print the QR code and post it at your event
- Volunteers can scan it from their phone to check in
Taking Attendance Walkthrough
Watch this video walkthrough of taking attendance at an event:
Video: Taking Attendance Walkthrough
People: Finding & Viewing Contacts
Solidarity Tech stores all your volunteer information in one place. Let's learn how to find and view volunteers in your contact list.
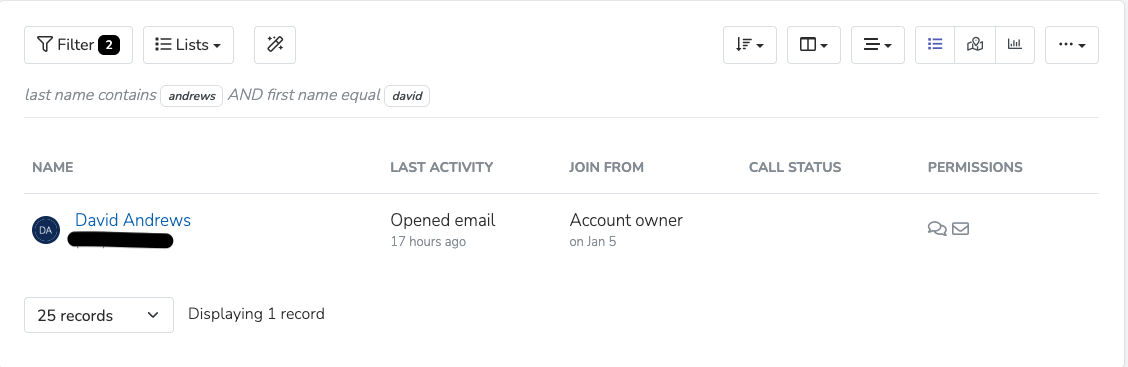
How to Find Someone
To look up a volunteer:
- Click "People" in the sidebar
- Use the filters on the left to narrow down your list (optional)
- Click on a person's name to open their profile
What You See on a Profile
When you click on someone, you'll see their volunteer profile with lots of useful information:
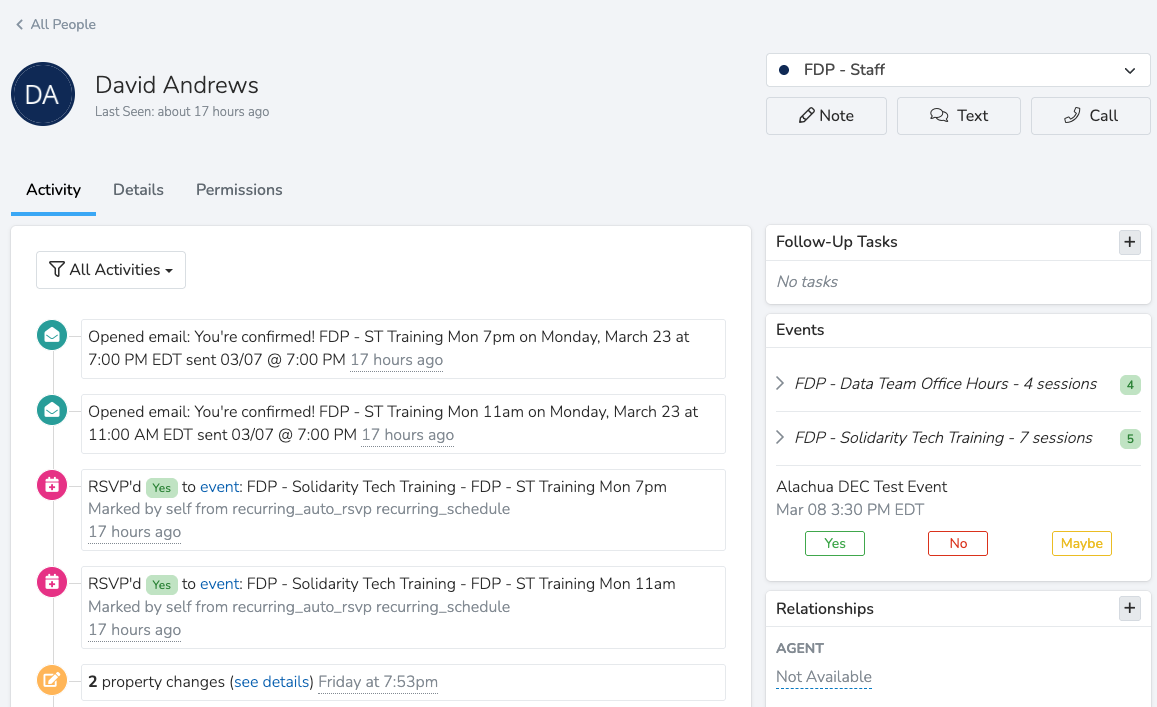
A profile includes:
- Main Details: Name and Assessment
- Activity Stream: Recent actions and communications
- Contact Details: Phone, email, address
- Chapters: Which groups or areas they're involved with
- Language: Preferred language for communications
- User Properties: Custom fields (volunteer type, skills, etc.)
- RSVP History: Events they've signed up for
- Attendance History: Events they've actually attended
- Notes: Internal notes about the volunteer
Viewing Your Contact List
In the People section, you have several ways to view and organize contacts:
- Sort: Sort by name, date added, or last activity
- Columns: Choose which information to display
- Map View: See volunteers plotted on a map
- Chart View: Visualize data about your volunteers
People: Searching & Filtering
With a large volunteer list, you need powerful tools to find exactly who you're looking for. Solidarity Tech's filtering system makes it easy. This same filter is in multiple places in Solidarity Tech but the functionality is the same.
How to Use the Filter
Here's the step-by-step process for filtering your contacts:
- Click "People" in the sidebar
- Click the "Filter" button (usually a funnel icon)
- Click "Add Filter" to start building rules
- Select a property to filter by (Name, Location, Event RSVP'd to, etc.)
- Choose an operator: "is", "is not", "includes", "excludes", etc.
- Enter the value you're looking for
- To add more rules, click "Add Filter" again
- Choose whether rules should use AND or OR logic
- Click "Apply" to see results
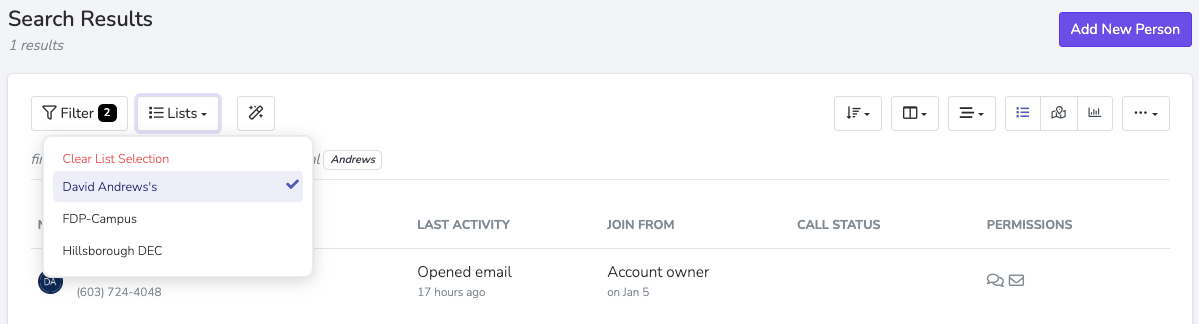
Useful Filters
Here are some common filters to help you find volunteers:
| What You Want | How to Filter |
|---|---|
| New sign-ups from last week | Created At is within last 7 days |
| People who RSVP'd to a specific event | RSVP'd Events includes [Event Name] |
| People who actually attended an event | Attended Events includes [Event Name] |
| Volunteers in a certain area | Location is [Zip Code/City] or Legislative Districts is [Congressional, Senate, House] |
| Volunteers for specific events or projects | Custom User Property: FDP - Volunteer Type includes includes [Type] |
Saving a Filter as a List
Once you've created a filter you like, you can save it to use again and share with your team:
- Create your filter (as described above)
- Click "Save as List"
- Give your list a name (e.g., "New Volunteers This Week")
- Your team can now use this saved filter
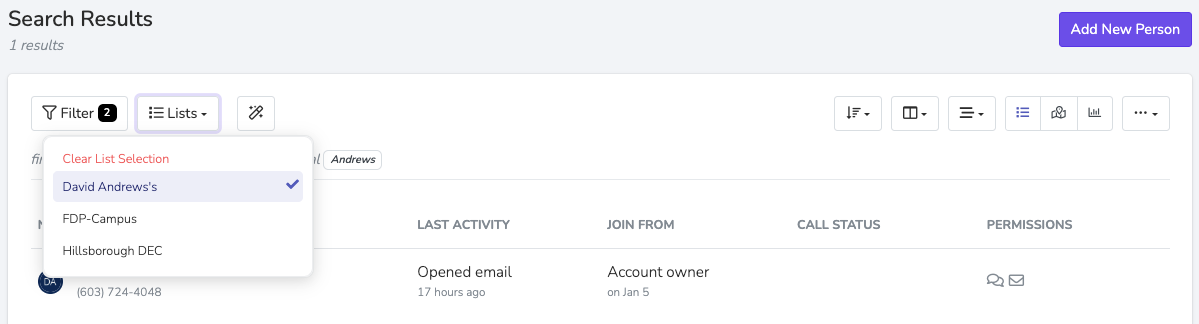
Video: Creating and Saving Filters
People: Adding a New Contact
You can add new volunteers to your system in multiple ways. Here's how to do it from the dashboard.
Adding Someone from the Dashboard
To manually add a new contact:
- Click "People" in the sidebar
- Click "Add Person" button
- Enter their First Name, Last Name, Phone, Email, and Zip
- Add any other information you have (address, volunteer type, etc.) using the add additional field dropdown
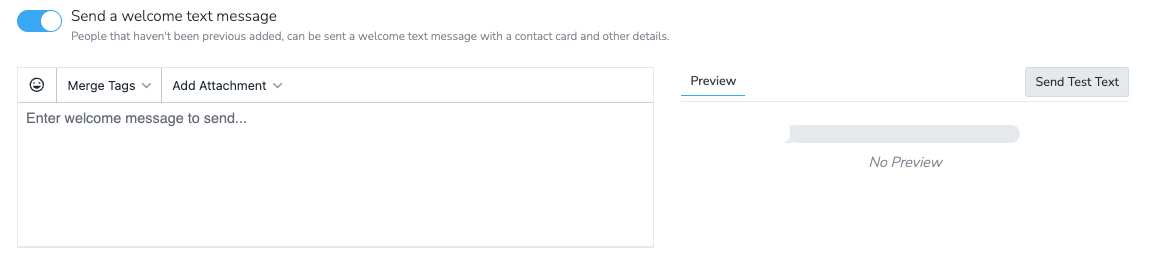
- Choose if you want to send them a welcome message
- Click "Save"
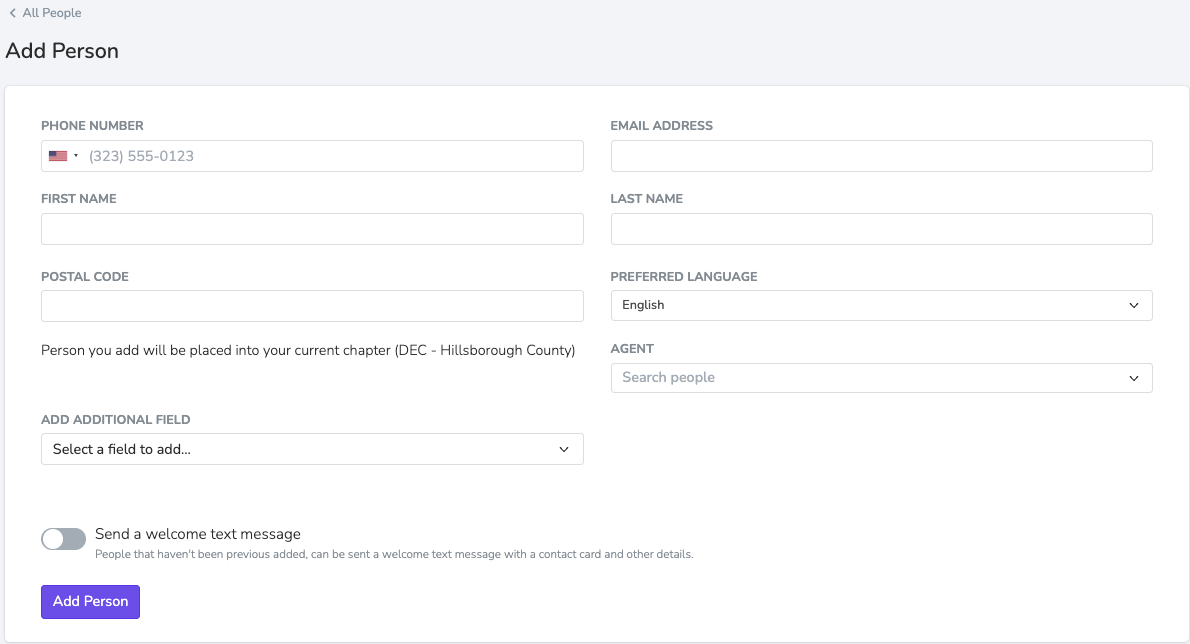
Adding a Welcome Text (Optional)
When adding someone new, you have the option to send them an automatic welcome text from the Solidarity Tech phone number:
Adding someone new at an Event
An easy way to add someone new is during event check-in:
- At the event, either open host tools or open the attendance screen
- With Host Tools: Click the + icon and add their info
- With the attendance screen: Search for the person's name or phone number
- If they're not found, click "Create New Contact"
- Enter their information
- They're automatically marked as checked in
- They're now in your volunteer database
Pages: Creating Forms & Sign-Up Pages
Beyond event pages, Solidarity Tech lets you create other types of pages to collect information from supporters and volunteers.
Types of Pages
Here are the different page types you can create:
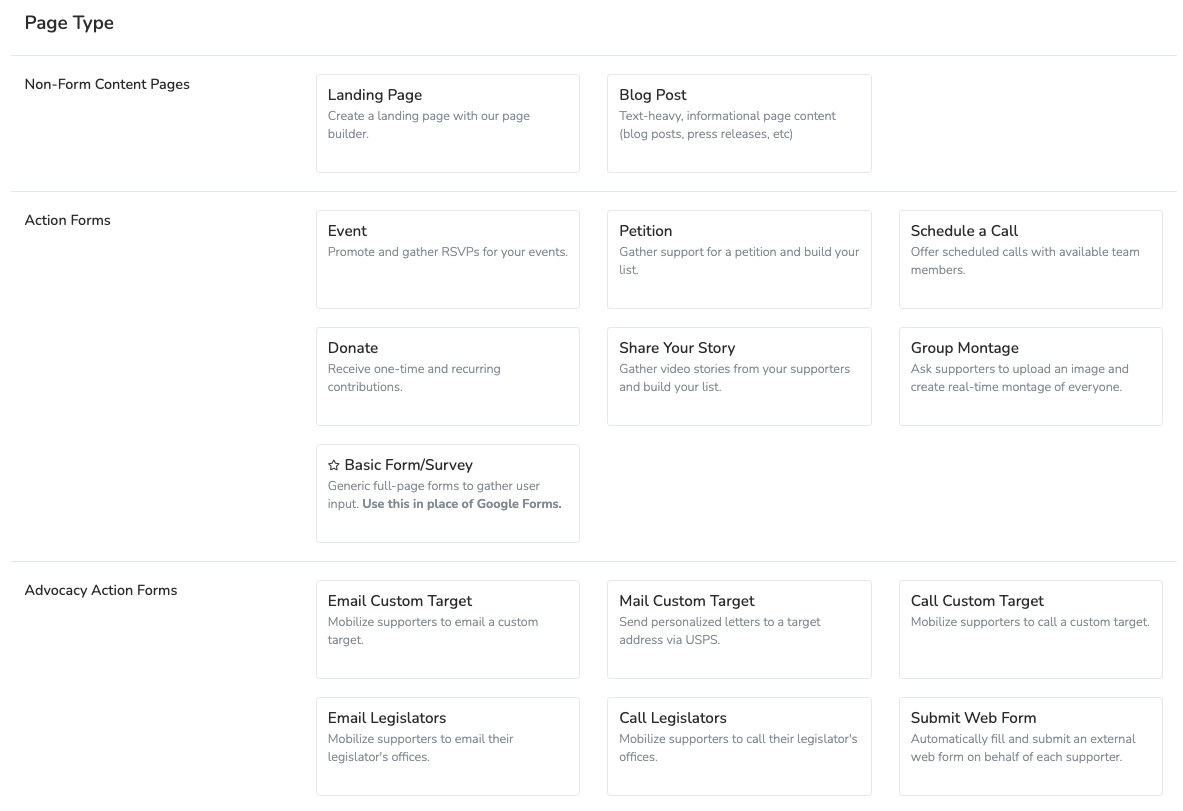
| Page Type | What It Does | Use For |
|---|---|---|
| Event Page | Promotion and signup for an event | Recruiting attendees |
| Basic Form | Collect custom information | Surveys, applications, feedback |
| Petition | Collect signatures/support | Building support for causes |
| Landing Page | Informational page with CTA | Education, fundraising |
| Blog Post | Long-form content | Sharing stories, education |
Organization Volunteer Form
Solidarity Tech includes a default volunteer sign-up form that works with smart automations:
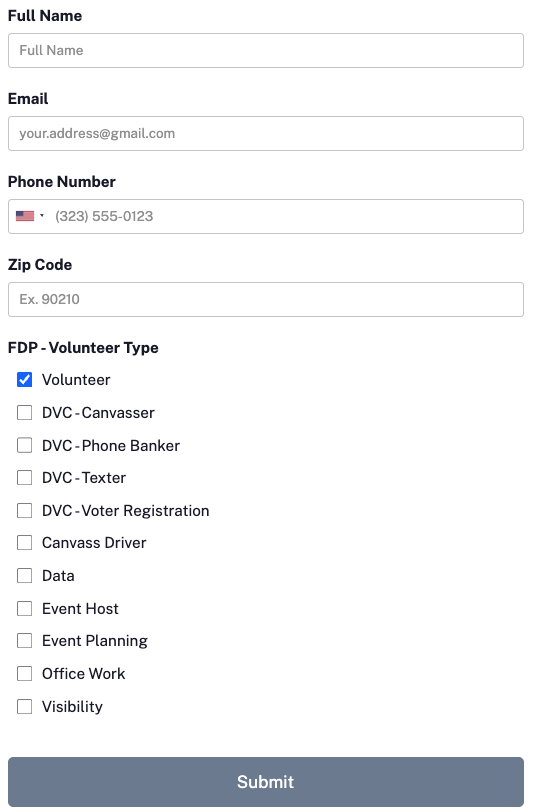
When someone fills out the volunteer form, here's what automatically happens:
- They receive a welcome email immediately
- Their Assessment is set to "Potential Volunteer"
- After 24 hours with no RSVP or event attendance, they get an email + text
- After 5 days with still no activity, they get another email
- Follow-up messages encourage them to get involved
Contacting Volunteers: Sending an Email Blast
Once you have volunteers in your system, Solidarity Tech makes it easy to reach out to them at scale. The Email Blast tool lets you compose a message, target the right audience using lists or filters, send a test, schedule it for the perfect time, and then track how it performed after it goes out.
What You'll Need Before Sending
- An Email Wrapper
- A verified Email Sender (the "From" email address)
- A list, filter, or saved segment of who you want to reach
- Admin permissions to actually send (Organizers can draft but not send)
Create a New Email Blast
All email blasts live in the Email → Email Blasts section of the dashboard. The page is organized into two tabs:
- Active & Scheduled Email Blasts: Drafts you're still working on and emails queued to send at a future time.
- Sent Email Blasts: Everything that has already gone out — click any row to see its performance report.
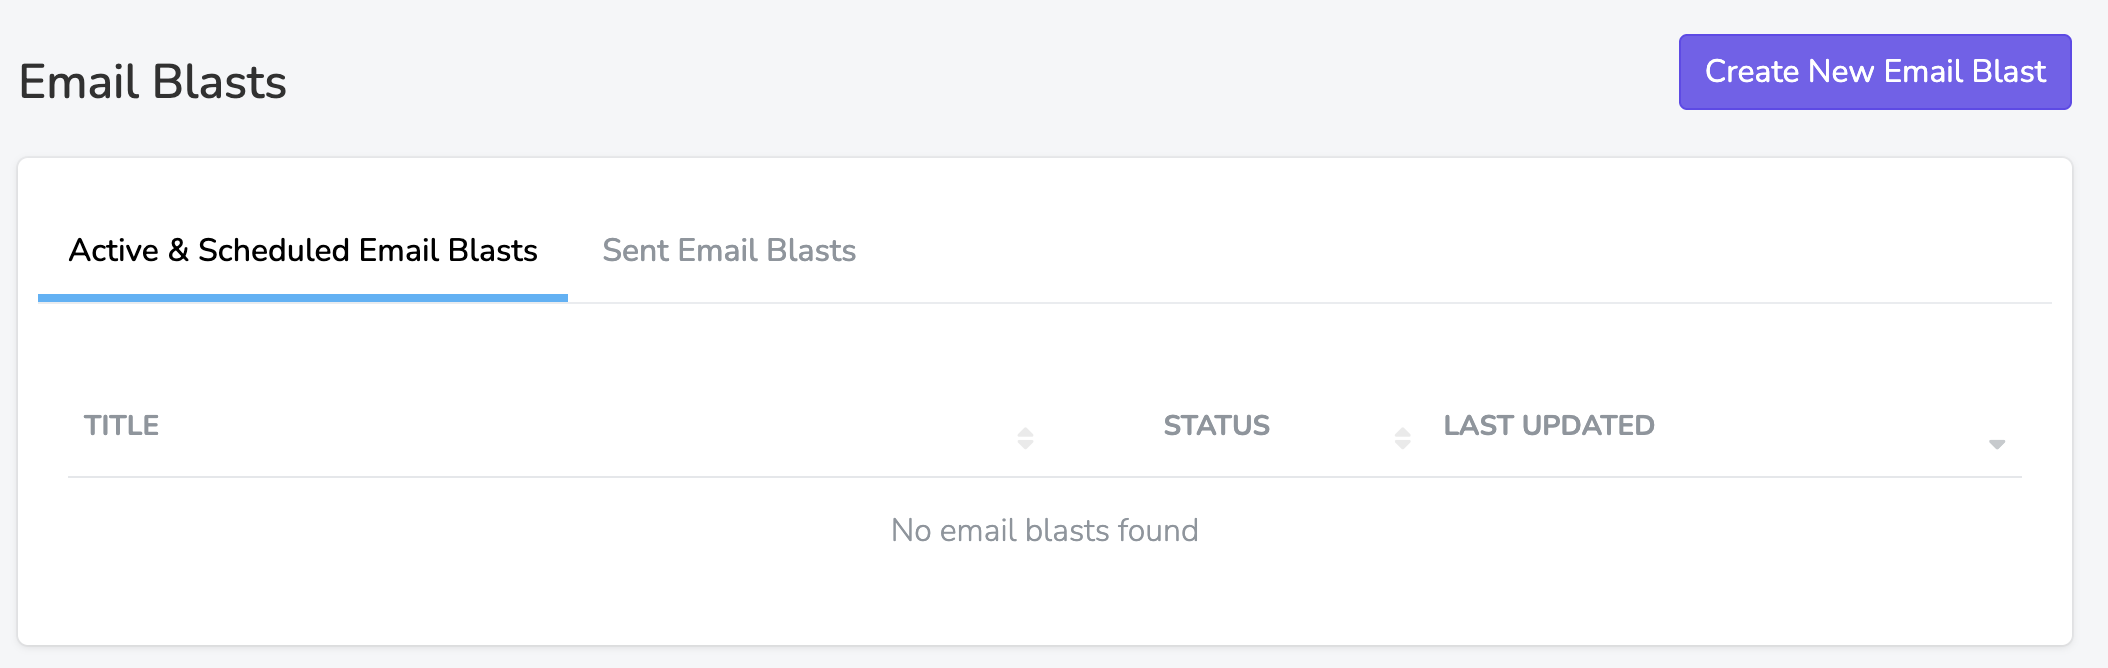
To start a new blast:
- Click Email in the left sidebar, then Email Blasts.
- Click the Create New Email Blast button in the top right.
- Give your blast an internal name (e.g., "May Newsletter — Volunteers" or "Phone Bank Recruitment 5/14"). This is for your team's reference and is not visible to recipients.
- Click Create New Blast to open the email editor. You'll choose your Email Sender and Email Wrapper inside the editor in the next steps.
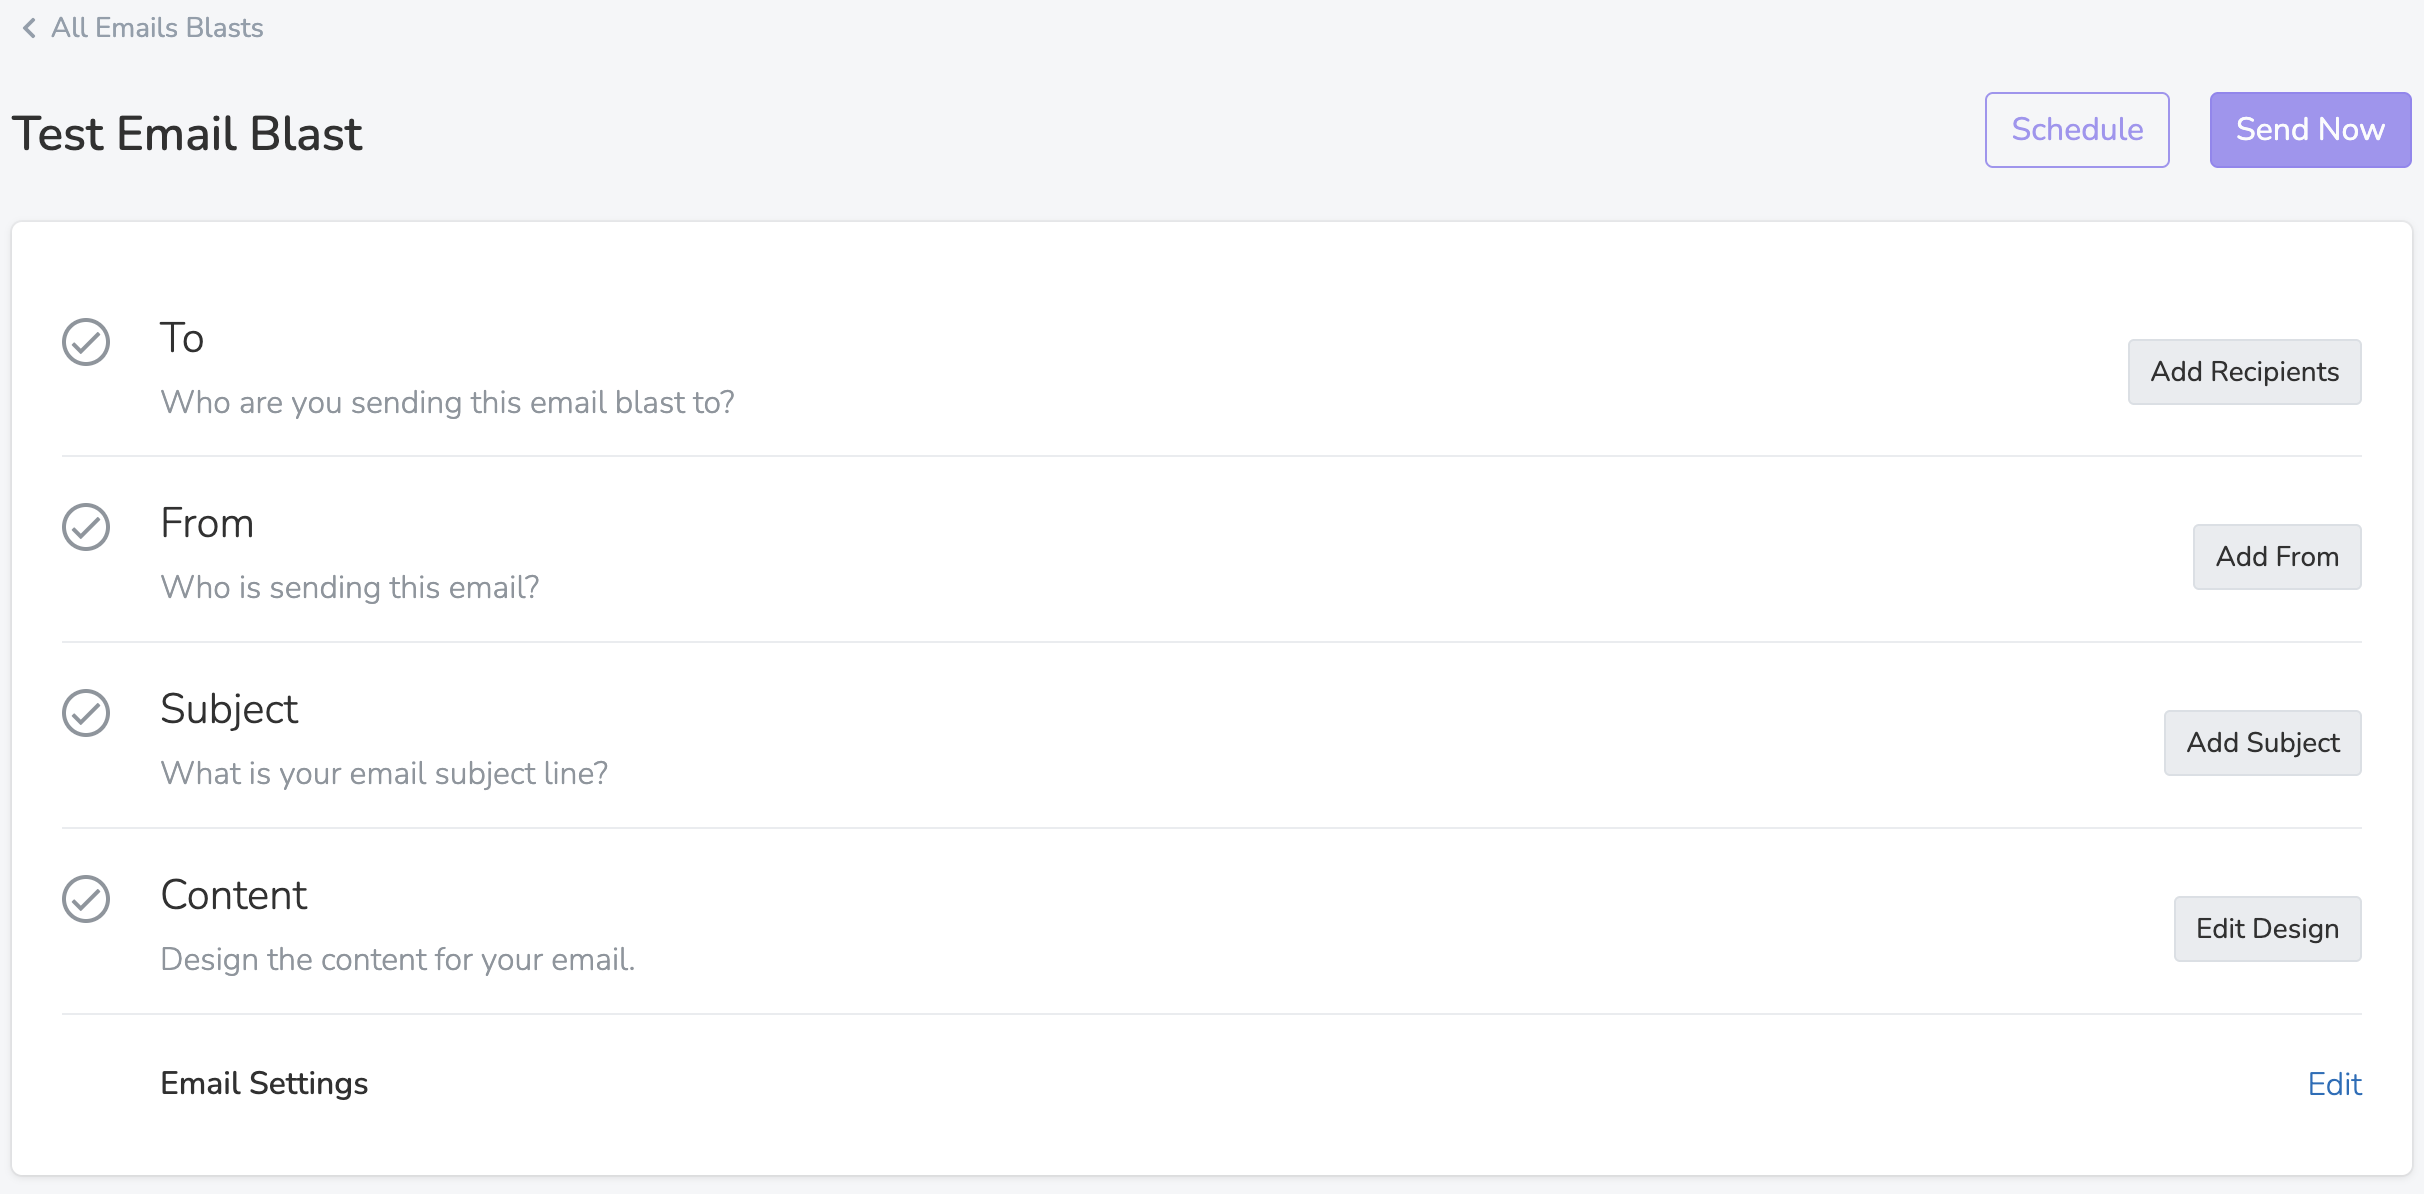
After clicking Create New Blast, you'll land on the email blast editor — a single page that walks you through everything from picking your sender and wrapper, to adding recipients, composing the message, sending tests, and finally sending or scheduling.
Choosing Recipients
The Add Recipients section is where you decide who actually receives the email. Solidarity Tech gives you several ways to target the right people, each with its own button on the side of the page.
| Recipient Source | What It Is | Best For |
|---|---|---|
| Saved List | A previously saved group of contacts | Recurring sends to the same audience (e.g., "Active Volunteers") |
| Filter | An on-the-fly query (zip, assessment, RSVP status, etc.) | One-off targeting — anyone in Broward who attended an event in the last 30 days |
| Event Attendees / RSVPs | Everyone tied to a specific event or session | Reminders, thank-yous, or follow-ups for a single event |
| Manual Selection | Hand-picked individual contacts | Small, specific groups (e.g., team leads only) |
To choose your audience:
- Scroll to the Add Recipients section inside the email editor.
- Click the source button on the side of the page that matches what you want — List, Filter, Event, or individual contacts.
- Build or select your filter — see the People: Searching & Filtering section for filter syntax.
- Review the estimated recipient count shown at the top of the page. This is your sanity check — if the number looks off, your filter probably is too.
Add From
The Add From section is where you set the "From" identity recipients see in their inbox, plus where any replies should go.
- Choose an Email Sender from the dropdown. This is the verified sender (name + address) that appears in the recipient's inbox. If your sender isn't listed, set one up in Settings → Email Senders first.
- Optionally add a Reply-To email address. When a recipient hits "Reply," their message goes here instead of the sender's address. Useful when your sender is a no-reply or shared address but you still want replies to reach a real inbox (e.g., your DEC email).
Add Subject
The Add Subject section is where you write the subject line that recipients see in their inbox. Keep it under ~50 characters so it isn't truncated on mobile, and lead with the most important word.
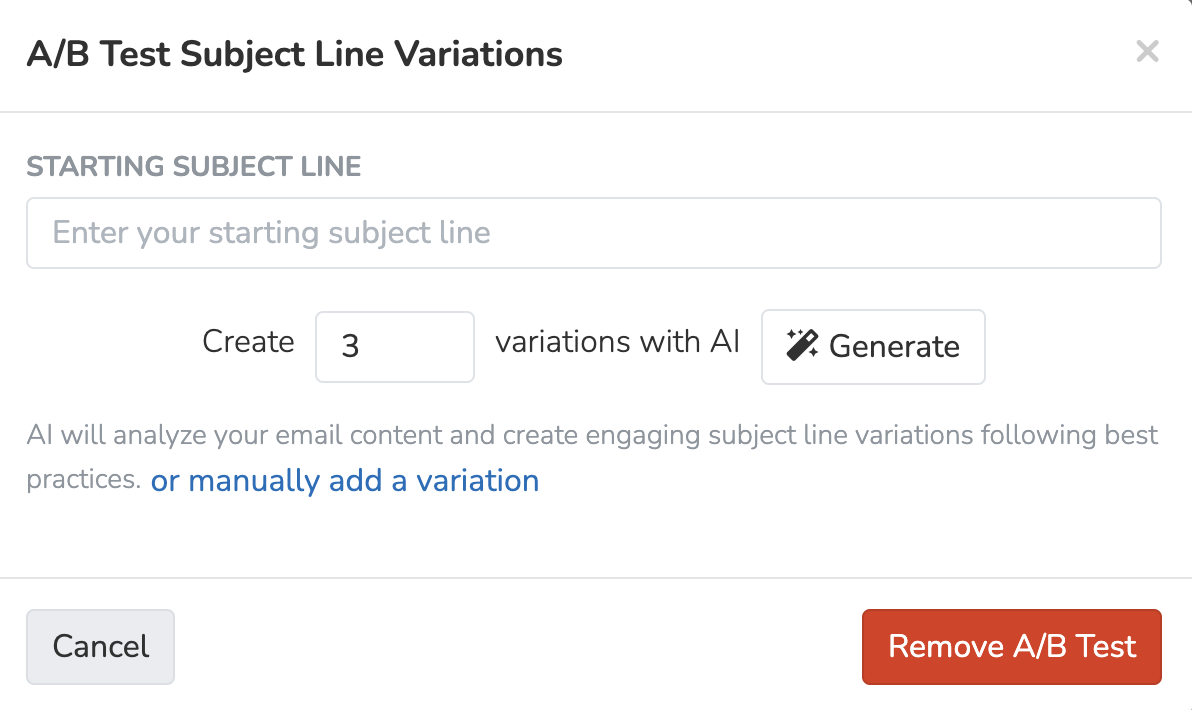
Solidarity Tech includes a built-in A/B Test option for subject lines. Instead of guessing which subject will perform best, you can let the data decide.
- In the Add Subject section, click the A/B Test Variations button to open the variation builder.
- Enter your starting subject line in the Starting Subject Line section — this is the baseline the variations will be compared against.
- To generate variations with AI, set the number of variations you want (the default is 3, but the number is editable) and click Generate. Solidarity Tech will draft variations off your starting subject line.
- To write your own instead, click the or manually add a variation link and type each variation in by hand.
- Review and edit any of the generated or manual variations until you're happy with the lineup.
Content
The Content section is where you write the actual email. Click Edit Design to open the editor — a split-screen view with the writing area on the left and a live preview on the right.
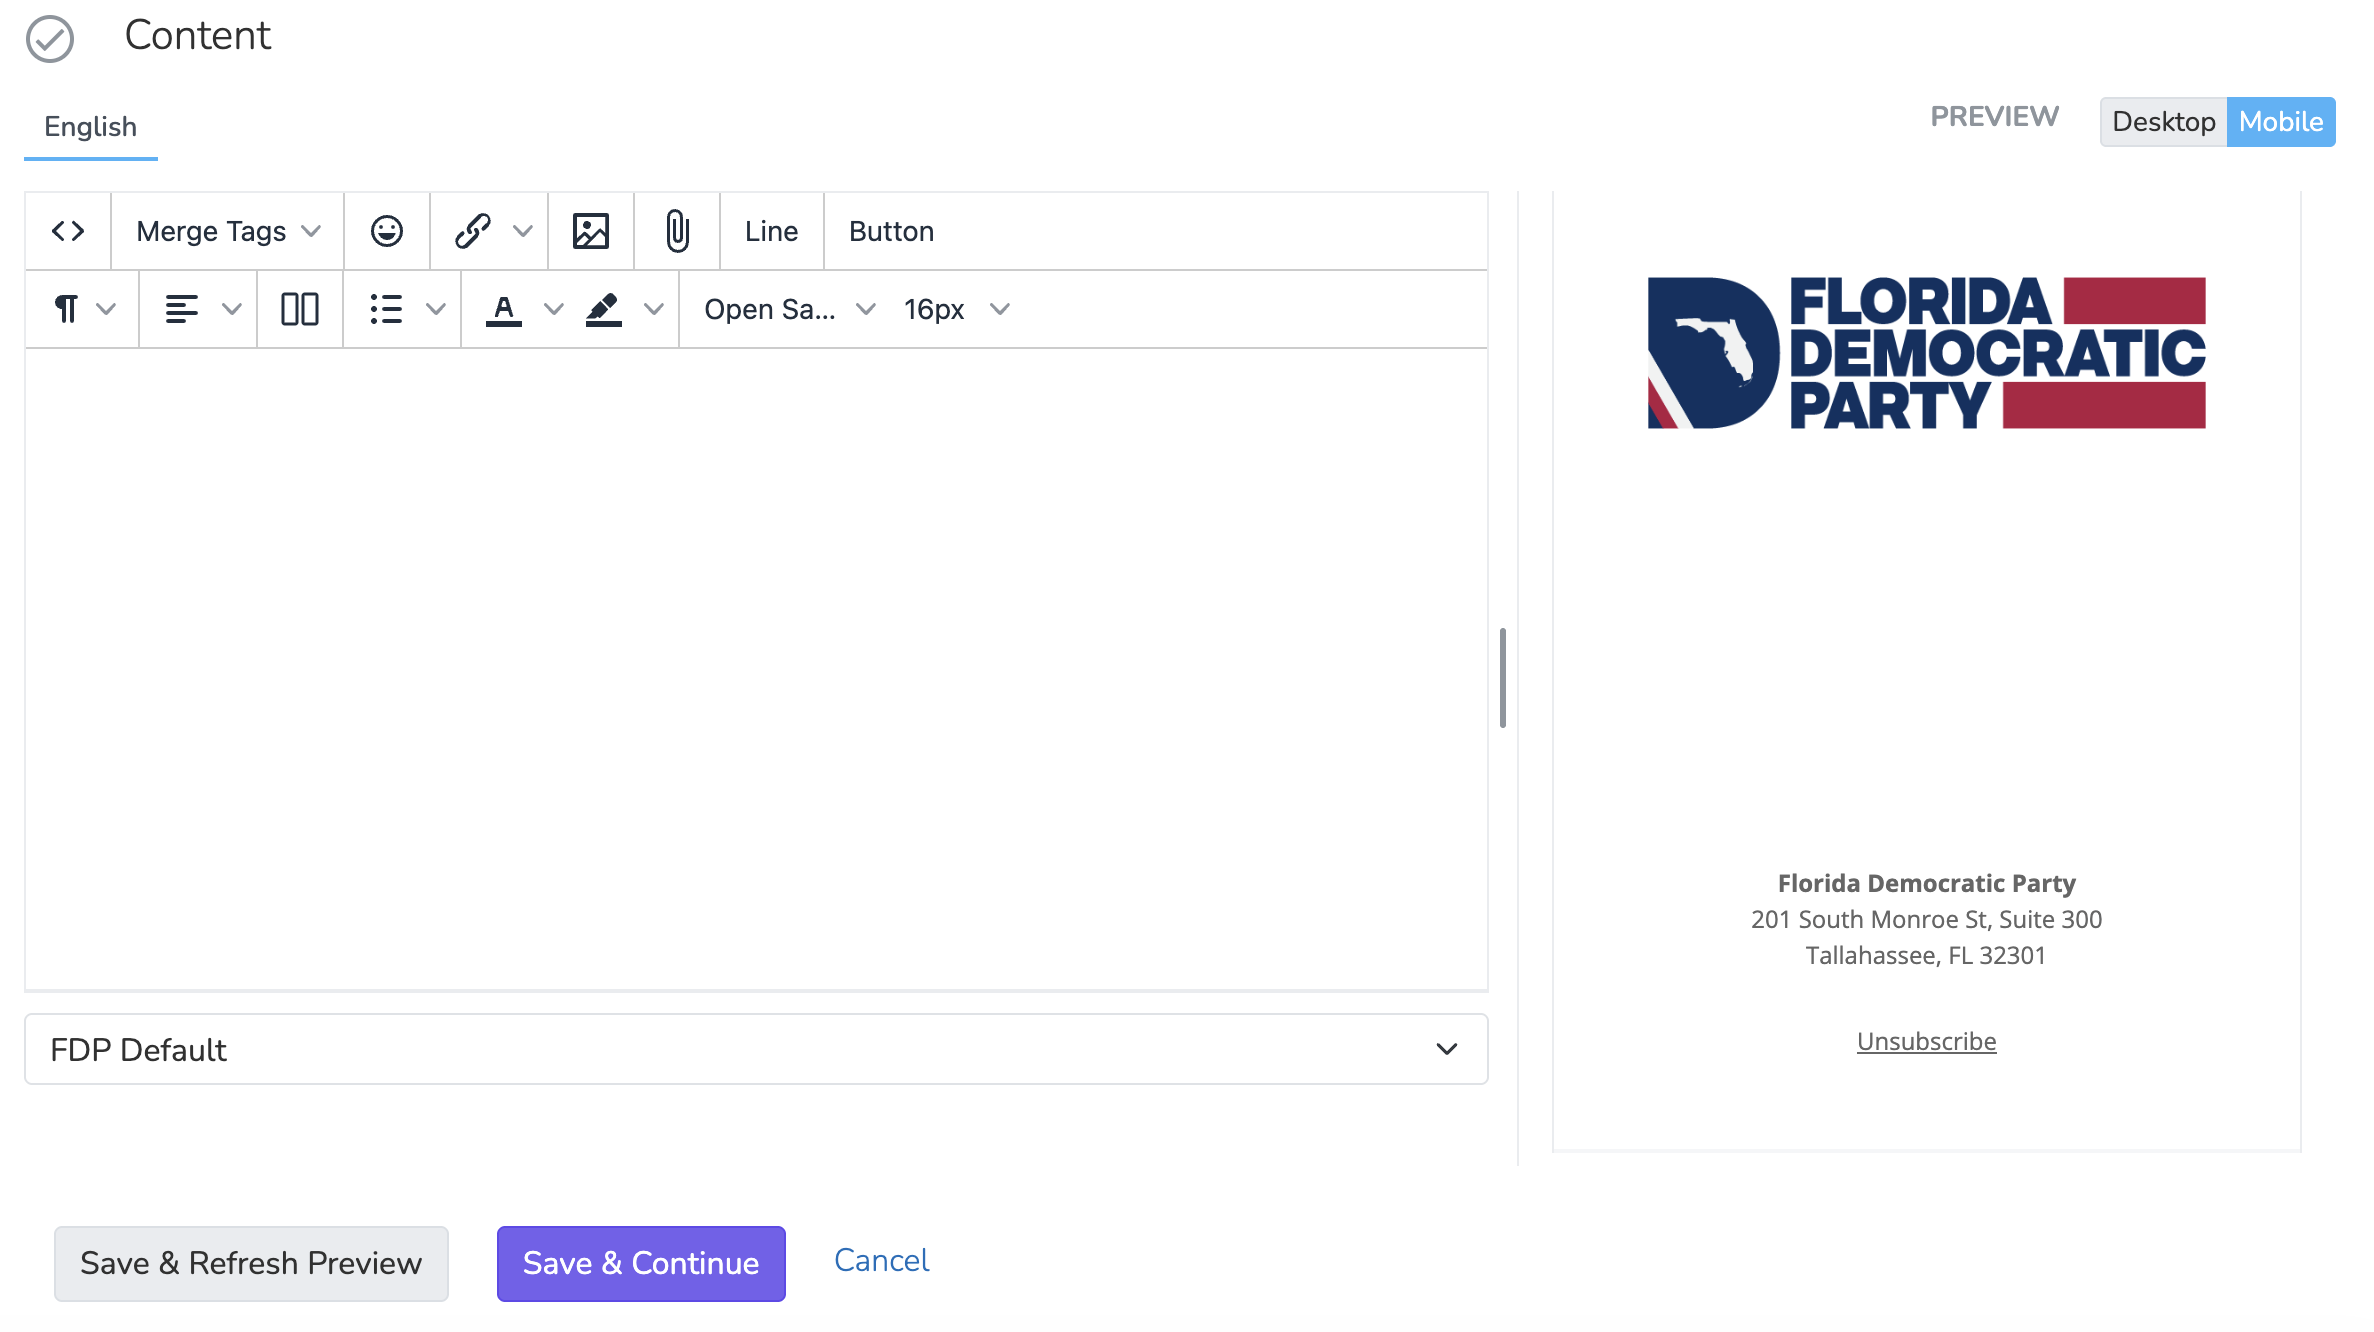
The editor works like a familiar rich-text editor (think Word or Google Docs) — you type and format text directly, with toolbars for everything you need to insert.
Top toolbar — insert elements:
- </> — switch to raw HTML view if you need to paste or hand-edit code
- Merge Tags — drop in personalization tokens like first name, last name, etc., so each recipient sees their own info
- Emoji — pick from an emoji picker
- Link — turn selected text into a hyperlink
- Image — upload or insert an image
- Attachment — attach a file to the email
- Line — insert a horizontal divider line
- Button — insert a styled call-to-action button
Second toolbar — format text:
- Paragraph style, alignment, and multi-column layout
- Bulleted and numbered lists
- Text color and highlight color
- Font family (e.g., Open Sans) and font size
If your organization sends in multiple languages, additional tabs (next to English) let you author a translated version of the same email. Recipients receive whichever language matches their profile.
At the bottom of the editor is the Email Wrapper dropdown (e.g., "FDP Default"). The wrapper provides the logo, footer, and other information that frame your message — all of which you can adjust in Settings → Email Wrappers. You can see the wrapper applied in the live preview on the right.
If your organization has multiple wrappers (newsletter vs. action alert, for example), pick the one that fits this blast.
The right side shows a live preview of how the email will look once it's wrapped. Use the Desktop / Mobile toggle in the top right to check both layouts — most supporters read on mobile, so the mobile view matters most.
Click Save & Refresh Preview at any point to update the preview without leaving the editor.
When you're finished:
- Save & Refresh Preview — saves your changes and refreshes the live preview, but keeps you in the editor
- Save & Continue — saves and returns you to the main blast page
- Cancel — discards changes since the last save and returns to the blast page
Sending a Test Email
Always send a test before sending the real thing. Tests render the email exactly as recipients will see it — wrapper, sender, merge tags, and all.
The Send Test option lives in the Content section on the main blast page, and only becomes available once the rest of the blast (Recipients, From, Subject, and Content) is set up.
- Back on the main blast page, scroll to the Content section.
- Click Send Test.
- Enter one or more email addresses (your own, plus a teammate or two).
- Send the test, then open it in your inbox and check it on both desktop and mobile.
Things to look for in your test:
- Subject line appears correctly
- From name/address looks right
- Images load (no broken image icons)
- Buttons and links go to the correct URLs
- Merge tags render in roughly the right places
- Email isn't going to spam — if your test lands in spam, your real send probably will too
Drafts & Scheduling
You don't have to finish an email in one sitting, and you don't have to send it the moment it's done.
There's no Save Draft button — Solidarity Tech autosaves your work as you go. Any blast you haven't sent or scheduled yet will appear under the Active & Scheduled Email Blasts tab with a "Draft" status. To resume, just click the blast name from that tab and pick up where you left off.
For most volunteer audiences, the best send times are weekday mornings (8–10 a.m. local time) and early evenings (5–7 p.m.). Use scheduling so you don't have to remember to hit Send at exactly the right moment.
- From the email editor, click Schedule instead of Send.
- Choose a date and time. The time is in your dashboard's time zone — double-check before confirming.
- Confirm. The blast will appear under the Active & Scheduled Email Blasts tab with a "Scheduled" status and the send time displayed.
- To change or cancel a scheduled blast, open it from the Active & Scheduled tab and click Reschedule or Cancel Schedule any time before the send time.
Tracking & Reviewing Results
After an email sends, Solidarity Tech tracks performance automatically. Open any blast from the Sent Email Blasts tab to see its report.
| Metric | What It Means | Healthy Range* |
|---|---|---|
| Delivered | Emails that successfully reached an inbox | 95%+ of sent |
| Open Rate | % of delivered emails that were opened | 20–40% for volunteer lists |
| Click Rate | % of delivered emails where someone clicked a link | 2–5%+ |
| Bounces | Emails that couldn't be delivered (bad address, full inbox) | Under 2% |
| Unsubscribes | Recipients who opted out via the email | Under 0.5% |
| Spam Reports | Recipients who marked the email as spam | Under 0.1% — anything higher is a deliverability red flag |
*Benchmarks vary by audience. Compare each send to your own organization's averages over time.
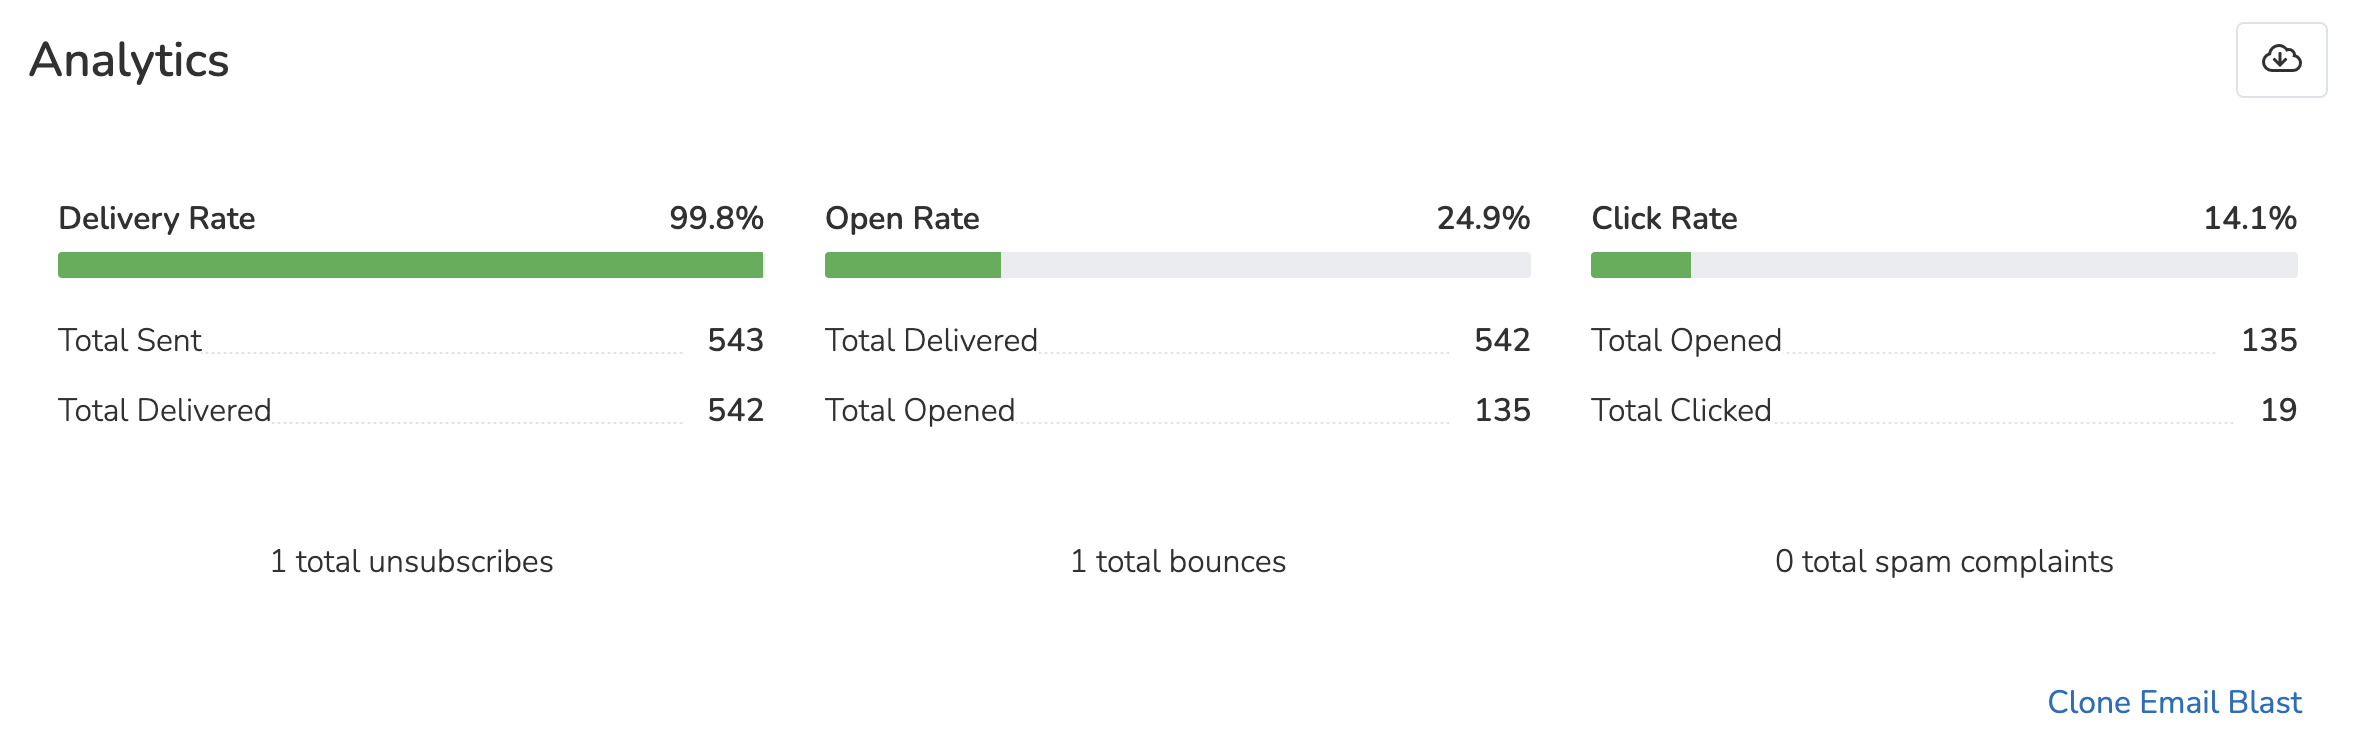
From the report page, you can:
- Click Opens, Clicks, or Bounces to see exactly which contacts took each action
- See a per-link breakdown of which call-to-action got the most clicks
- Save any of those groups as a new List (e.g., "Clicked May newsletter") to use as the audience for a follow-up email
- Export the full results to CSV for deeper analysis
Bounces & Deliverability
Solidarity Tech automatically monitors email bounces to protect your sender reputation and keep your contact data clean. You don't have to do anything to enable this — it just runs in the background. But it's worth understanding what's happening so you know what to expect on a contact's profile.
| Bounce Type | What Happens |
|---|---|
| Permanent bounce (invalid address, no mailbox) |
The email is immediately removed from the profile and moved to "Other Emails." An activity is logged. |
| Transient bounce (mailbox full, temporary issue) |
The email is retained, but if 3 consecutive emails bounce, it's removed. |
| Suppression list | If 2 consecutive emails hit the suppression list, the email is removed. |
When an email bounces, an activity entry is added to the contact's profile. You may see:
- Email bounced (permanent) — the address was invalid
- Email bounced (transient) — temporary delivery issue
- Reset email to blank following bounces — the email was removed after repeated failures
Before removing a bounced email, the system tries to auto-correct common typos (for example, gmial.com → gmail.com). If a correction is found, the email is updated instead of removed.
If someone marks one of your emails as spam, their email permission is automatically revoked so future blasts don't go to that address. This protects your domain's deliverability for everyone else on your list.
Quick Reference: Email Blast Workflow
| Step | What You Do | Where |
|---|---|---|
| 1 | Create new blast and name it | Email → Email Blasts → Create New Email Blast |
| 2 | Choose recipients (list, filter, or event) | Add Recipients section |
| 3 | Set sender and (optional) Reply-To | Add From section |
| 4 | Write subject (and optionally A/B test it) | Add Subject section |
| 5 | Build the email body | Content section → Edit Design |
| 6 | Send a test to yourself + a teammate | Send Test button |
| 7 | Send now or schedule for later | Send / Schedule button |
| 8 | Review report after delivery | Email Blasts → Sent Email Blasts tab |
Troubleshooting & Common Questions
Got a problem? Here are answers to the most common questions volunteers ask about Solidarity Tech.
Login Problems
Solution: Contact your DEC chair. They need to add you to the Solidarity Tech system. Once they do, you'll receive an invitation via text or email. Check your spam folder if you don't see it right away.
Solution: Make sure you completed the account setup process by clicking the link and submitting your email and password. Simply being in the contacts database is not enough. If you've already done that and still can't log in, try the password reset process on the login page.
Solution: Go to the login page and click "Forgot Password." Enter your email address and follow the reset link sent to your email. Make sure to check your spam folder.
Quick Reference: Login Troubleshooting
| Problem | Solution |
|---|---|
| No invitation received | Contact your DEC chair to be added to the system |
| Can't log in after invitation | Make sure you completed account setup; try password reset |
| Invitation link expired | Ask your DEC chair to resend the invitation |
| Getting error messages when logging in | Contact FDP Data Team or Solidarity Tech Support |
Missing Events or Contacts
Problem: I can't find an event or contact I'm looking for.
Solution: Check your scope (top left corner of dashboard). You might be viewing the wrong organization's data. Switch to the correct organization in your scope selector.
Event Issues
Problem: Event types cannot be changed after creation.
Solution: If your event needs both a physical address and a meeting link, switch to the Hybrid event type when you create it. If you've already created the event with the wrong type, you'll need to delete it and create a new one with the correct type (note: this will cancel any existing RSVPs, so reach out to RSVPed attendees first).
Solution: No problem! You can add them as a walk-in during check-in. Either use Host Tools (click the + button) or search for them in the Attendance screen and create a new contact if they don't exist. They'll be added to your volunteer list automatically.
Permissions Issues
Problem: A button is grayed out and I can't do something I need to do.
Solution: This means your role doesn't include that permission. Talk to your DEC chair about getting a role upgrade. Here's the quick reference:
- Can't see People? Your role might be User or Organizer - need Admin
- Can't create events? Your role might be User - need Organizer or Admin
- Can't send emails (only draft)? Your role might be Organizer - need Admin
Getting Help
If you can't find the answer to your question here, here's who to contact:
| Issue | Contact |
|---|---|
| Need access or higher permissions | Your DEC or Organization Chair |
| Technical problems or bugs | FDP Data Team |
| General support questions | support@solidarity.tech |
| Trainings | FDP Data Team |
| Feature questions | FDP Data Team |
Email Wrappers & Domain Setup
Before you send emails through Solidarity Tech, two things need to be set up: an Email Wrapper (the branded template that frames every email) and an Email Domain (your organization's sending address). Getting these right improves deliverability and makes your emails look professional and on-brand.
Email Wrappers
An Email Wrapper is a reusable template that surrounds your email content. Every email you send — blasts, event confirmations, system notifications — is displayed inside a wrapper. Wrappers include your organization's logo, header, footer, brand colors, and the required mailing address for spam law compliance. You can create multiple wrappers for different email types (e.g., newsletters, action alerts, internal notices).
How to Create an Email Wrapper
- From the main dashboard, navigate to Settings in the left sidebar, then select Email Wrappers.
- Each chapter will have a default wrapper already created but feel free to edit it or create new ones!
- Click Add New Email Wrapper to open the wrapper editor.
- Give your wrapper a descriptive name (e.g., "Main Newsletter Wrapper" or "Action Alert Wrapper").
- Use the drag-and-drop editor to add your organization's logo, set header and footer content, and apply your brand colors.
- Review the preview to confirm the mailing address appears in the footer (auto-inserted from org settings).
- Click Save. Your wrapper is now available to select whenever you compose an email.
Email Domains
Connecting a custom email domain (e.g., @yourorg.com) to Solidarity Tech improves deliverability and prevents your emails from landing in spam. It also makes your "From" address look professional rather than generic. Custom domains are required for high-volume sending.
Setting up a custom domain involves adding DNS records to your domain provider. There are three record types you'll need to configure:
| DNS Record | What It Does |
|---|---|
| DKIM | Digitally signs your emails so receiving servers can verify they're legitimate |
| SPF | Tells mail servers which services are authorized to send email on behalf of your domain |
| DMARC | Instructs mail servers what to do if DKIM or SPF checks fail (helps protect your domain from spoofing) |
How to Connect Your Email Domain
- Go to Settings → Email Domains in the dashboard.
- Click Add New Email Domain and enter your domain name (e.g.,
floridadems.org). - Solidarity Tech will generate the DNS records you need to add — copy these values.
- Log in to your domain registrar (e.g., GoDaddy, Namecheap, Cloudflare) and navigate to your DNS settings.
- Add the DKIM, SPF, and DMARC records provided by Solidarity Tech.
- Return to Solidarity Tech and click Verify Domain. The system will check that the records are in place.
Email Senders
An Email Sender is the "From" name and email address that recipients see when they receive your emails. You can create multiple senders — for example, different staff members, departments, or campaign identities — and choose the appropriate one when composing each email.
How to Create an Email Sender
- Go to Settings → Email Senders in the dashboard.
- Click Add New Email Sender.
- Enter the display name (e.g., "Jane Smith" or "Info") and the email address you want to send from.
- Once you have connected a custom domain, use an address on that domain for best deliverability.
- Save the sender. It will now appear in the sender dropdown whenever you draft an email.
Zoom Setup
Solidarity Tech integrates with Zoom for Virtual Events. A Zoom account is connected to an event for automatic meeting creation and attendance tracking
Zoom for Virtual Events
When you create a virtual event in Solidarity Tech and connect it to Zoom, the platform automatically creates a Zoom meeting, generates personalized join links for each attendee, and tracks attendance automatically when people join — no manual check-in needed.
How to Connect Zoom to a Virtual Event
- Create or open an existing event in the Events section of the dashboard.
- When adding or editing an event session, set the Location Type to Virtual.
- In the location field, you'll see the option to connect Zoom. Click Connect Zoom Account.
- You'll be redirected to Zoom to authorize the connection — log in and approve the integration.
- You can then choose an Account Name for the Zoom account.
- You can add as many Zoom accounts as you have.
- Once connected, Solidarity Tech will automatically generate a unique Zoom meeting for that session.
- Attendees who RSVP will receive personalized Zoom join links in their confirmation emails.
Website Settings
Your Solidarity Tech organization comes with a built-in website where all your public pages are hosted. Website Settings let you control how that site looks and functions — from the navigation bar and footer to your domain name and announcement banners. These settings affect every page on your site, so changes here have broad impact.
Navigation Bar & Footer
The navigation bar appears at the top of every page on your site, and the footer appears at the bottom. Both are managed from Website Settings (Pages-Header) and display consistently across all your pages.
In the Navigation & Footer settings you can:
- Add or remove navigation menu items and links
- Upload and configure your organization's logo
- Change the background color
- Set your organization's display name
- Customize the footer with HTML
- Add and edit an Announcement Banner
How to Edit Your Navigation & Footer
- From the dashboard, go to Pages in the left sidebar.
- Select the Header tab.
- Use the editor to add, remove, or reorder menu items. Click a menu item to edit its label and link destination.
- Upload your logo by clicking the logo area and selecting an image file.
- After changes Click Save to apply your changes across all pages.
Custom Domain & Subdomain
By default, your Solidarity Tech website is accessible at a solidarity.tech subdomain (e.g., yourorg.solidarity.tech). You have two options depending on your situation: connect a custom domain if your organization doesn't already have a website, or connect a custom subdomain if you do.
yourorg.com). Already have a website at yourorg.com? Use a Custom Subdomain instead (e.g., act.yourorg.com) so your existing site is unaffected.
Option A: Connect a Custom Domain
Use this if your organization doesn't have an existing website and you want Solidarity Tech to be your primary web presence.
- Go to Pages → Domains in the dashboard.
- Click Connect next to Connect a Custom Domain
- Enter the domain you want to connect (e.g.,
www.yourorg.com). - Solidarity Tech will display the DNS records you need — typically a CNAME record pointing to Solidarity Tech's servers.
- Log in to your domain registrar (e.g., GoDaddy, Namecheap, Cloudflare) and add the DNS record provided.
- Return to Solidarity Tech and click Verify. Once DNS has propagated, your custom domain will be live.
Option B: Connect a Custom Subdomain
Use this if your organization already has an active website (e.g., yourorg.com) and you want your Solidarity Tech pages to live on a subdomain like act.yourorg.com or join.yourorg.com. This keeps your existing website completely untouched.
- Decide on your subdomain prefix — common choices are
stech,join,get-involved, oract. - Go to Pages → Domains in the dashboard
- Click Connect next to Connect a Custom Subdomain
- Enter your full subdomain (e.g.,
stech.yourorg.com). - Solidarity Tech will provide a CNAME record to add to your DNS. The host/name field will be just your subdomain prefix (e.g.,
act) and the value will point to Solidarity Tech's servers. - Log in to your domain registrar and add the CNAME record — do not touch any existing records for your root domain.
- Return to Solidarity Tech and click Verify.
Announcement Banner, Shortlinks & Push Notifications
Announcement Banner: Display a prominent banner at the top of all your website pages. Useful for active campaigns, urgent announcements, or driving supporters to a specific action. You can set the banner text and optionally include a call-to-action link. The banner can be toggled on or off without deleting it.
Shortlinks: Create short, memorable URLs for any page on your site (e.g., yourorg.com/event instead of a long auto-generated URL). Shortlinks are ideal for sharing in texts, emails, and on social media where long URLs are unwieldy. They are hosted on your solidarity.tech subdomain or custom domain.
Push Notifications: Send browser push notifications to supporters who have opted in to notifications from your website. Use push notifications to re-engage supporters quickly with time-sensitive updates or campaign calls to action. Subscribers must opt in through a browser prompt on your site before they can receive push notifications.
| Feature | Best Used For | Found Under |
|---|---|---|
| Announcement Banner | Urgent site-wide messages, active campaigns | Pages → Header → Announcement Banner |
| Shortlinks | Shareable links for texts, emails, social media | Pages → Shortlinks |
| Push Notifications | Re-engaging opted-in supporters quickly | Pages → Push Notifications |